Want this as a document?
Download the Administrator Guide to print or share.

Simple Asset Tracker
Administrator Guide
Setting up and running your asset register
Version 1.2.5 · 09 October 2026
About this guide
This guide is for the person who administers Simple Asset Tracker: the holder of the built-in master administrator account. It walks through every section of the application and every setting you can configure.
Screenshots are marked with numbered red badges. Each badge corresponds to a numbered step in the text directly beneath it, so one picture usually covers several steps.
Who can do what
Simple Asset Tracker has five roles. The master administrator — the account named simpleadmin — is an Administrator with a few extra powers that no other account has, noted throughout this guide.
| Role | What it is for |
|---|---|
| Administrator | Full run of the application: assets, users, events, imports, settings. |
| Physical Verifier | Walks the floor during a verification event and records what they find. |
| Asset Tag Owner | Prints asset labels and confirms they have been stuck on. |
| Issue Tracker | Issues assets to people and records their return. |
| Viewer | Read-only access to the dashboard and events. |
Signing in for the first time
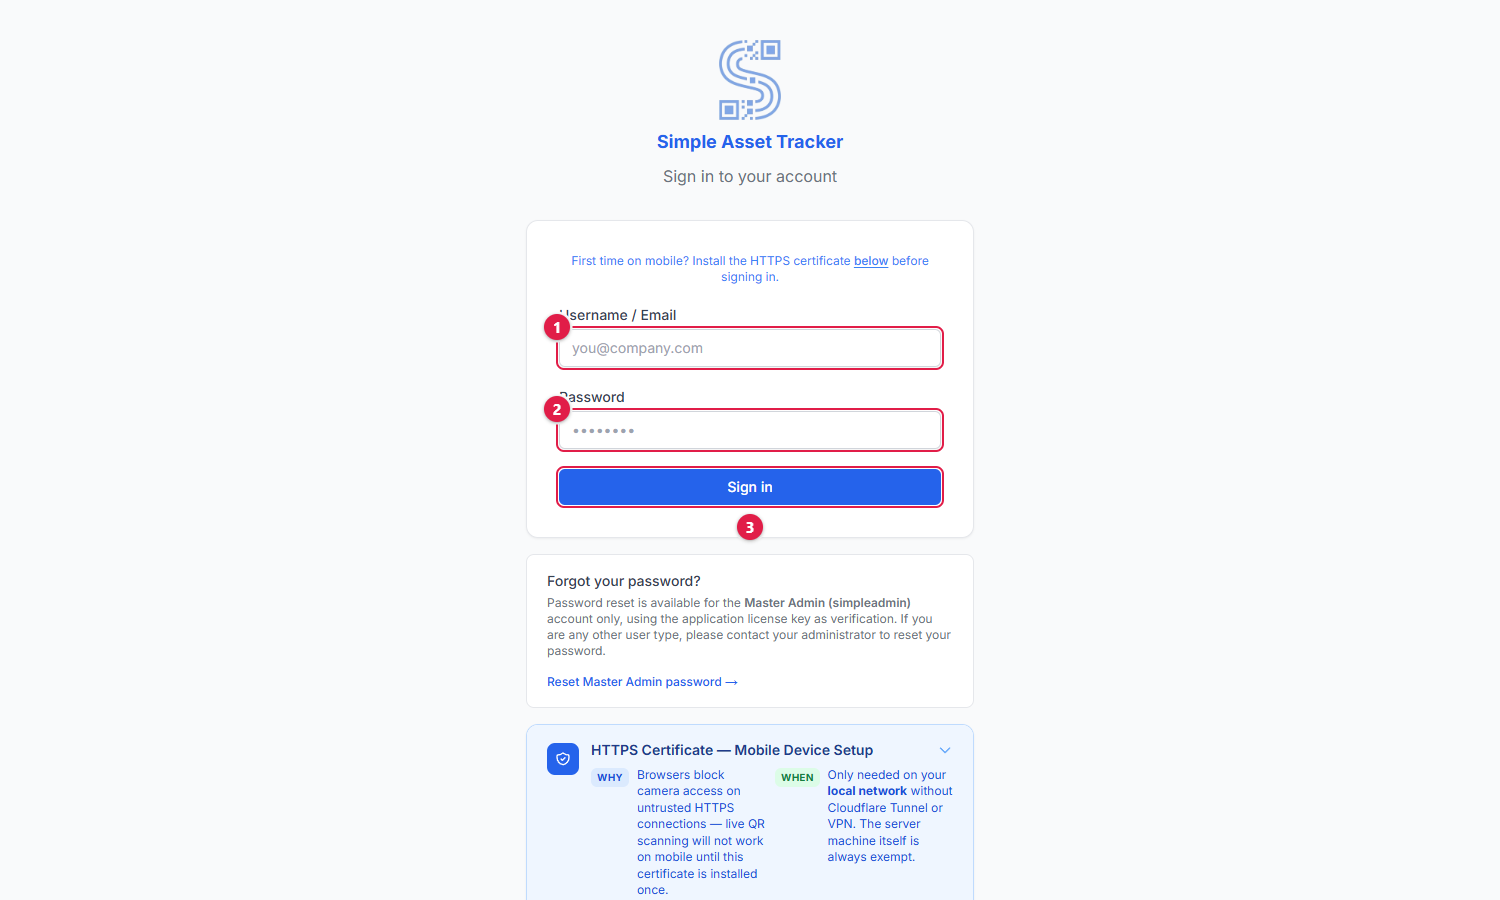
- 1.Type the username. The built-in administrator account is simpleadmin.
- 2.Type the password. On a new installation this is simpleadmin@123.
- 3.Click Sign In.
If you forget the master password
There is a recovery screen at /reset-master-password. It asks for your licence key as proof of identity and then lets you set a new master password. Attempts are rate limited, so if you mistype the key several times you will be asked to wait before trying again.
Finding your way around
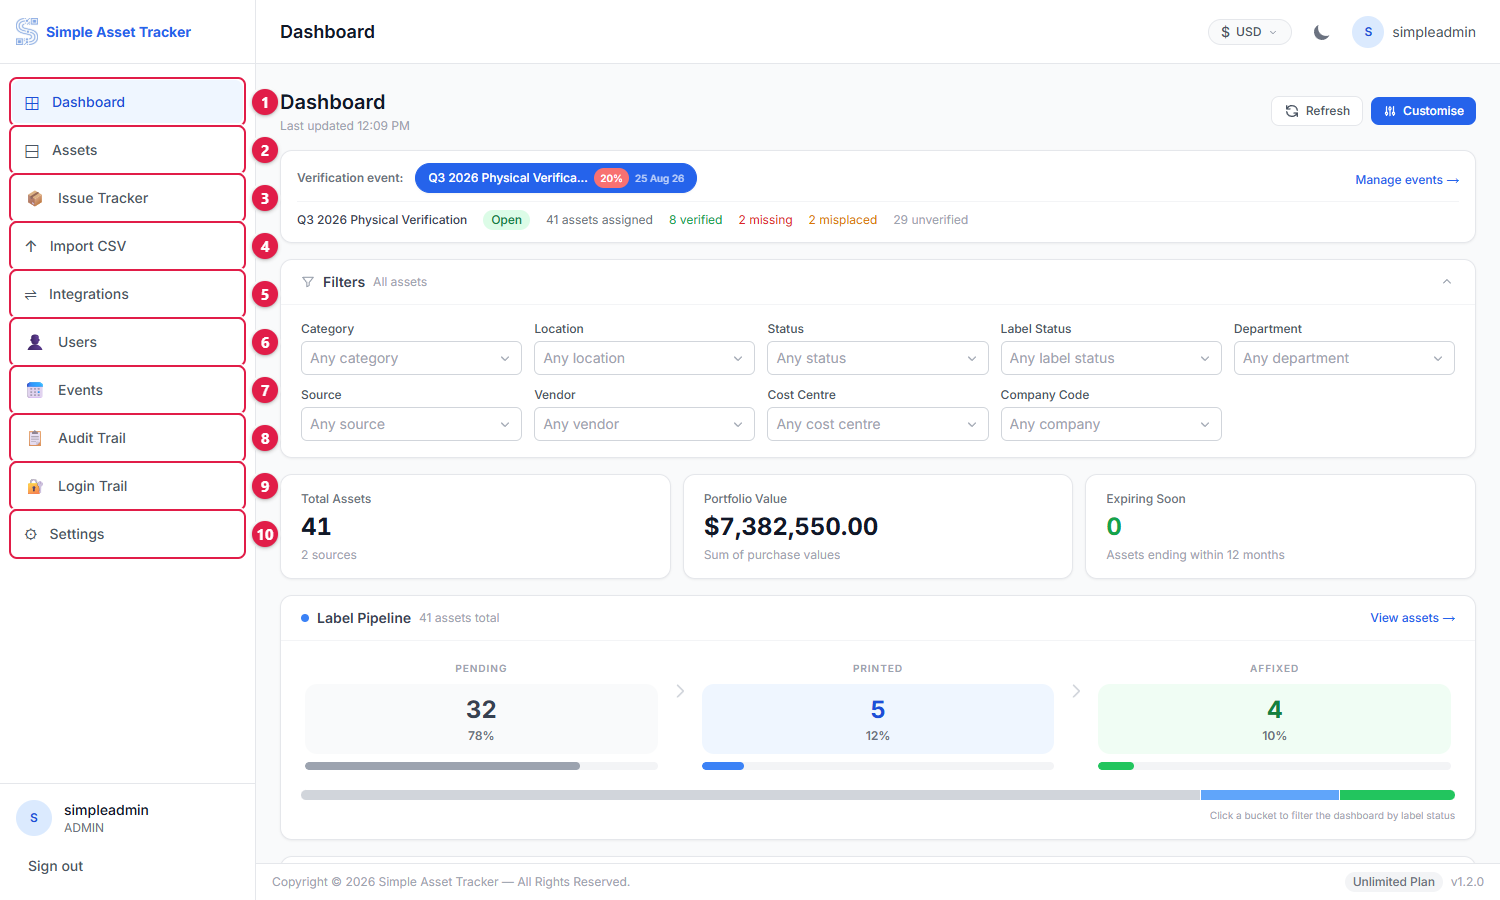
The sidebar is the main way you move around the application.
| # | Section | What you do there |
|---|---|---|
| 1 | Dashboard | Overview of the register: totals, value, verification and label progress. |
| 2 | Assets | The register itself — search, filter, edit, print labels, export. |
| 3 | Issue Tracker | Issue assets to people and record their return. |
| 4 | Import CSV | Bring assets in from a spreadsheet. |
| 5 | Integrations | Connect SAP, Oracle Fusion or Zoho Books. Master administrator only. |
| 6 | Users | Create accounts and assign roles. |
| 7 | Events | Plan and run physical verification rounds. |
| 8 | Audit Trail | Every change made in the system. Master administrator only. |
| 9 | Login Trail | Who signed in, when, and from where. |
| 10 | Settings | Licence, branding, backups, network and remote access. |
Your account name and role are shown at the bottom of the sidebar, with Sign out beneath. The bar across the top carries the page title and a currency selector.
Dashboard
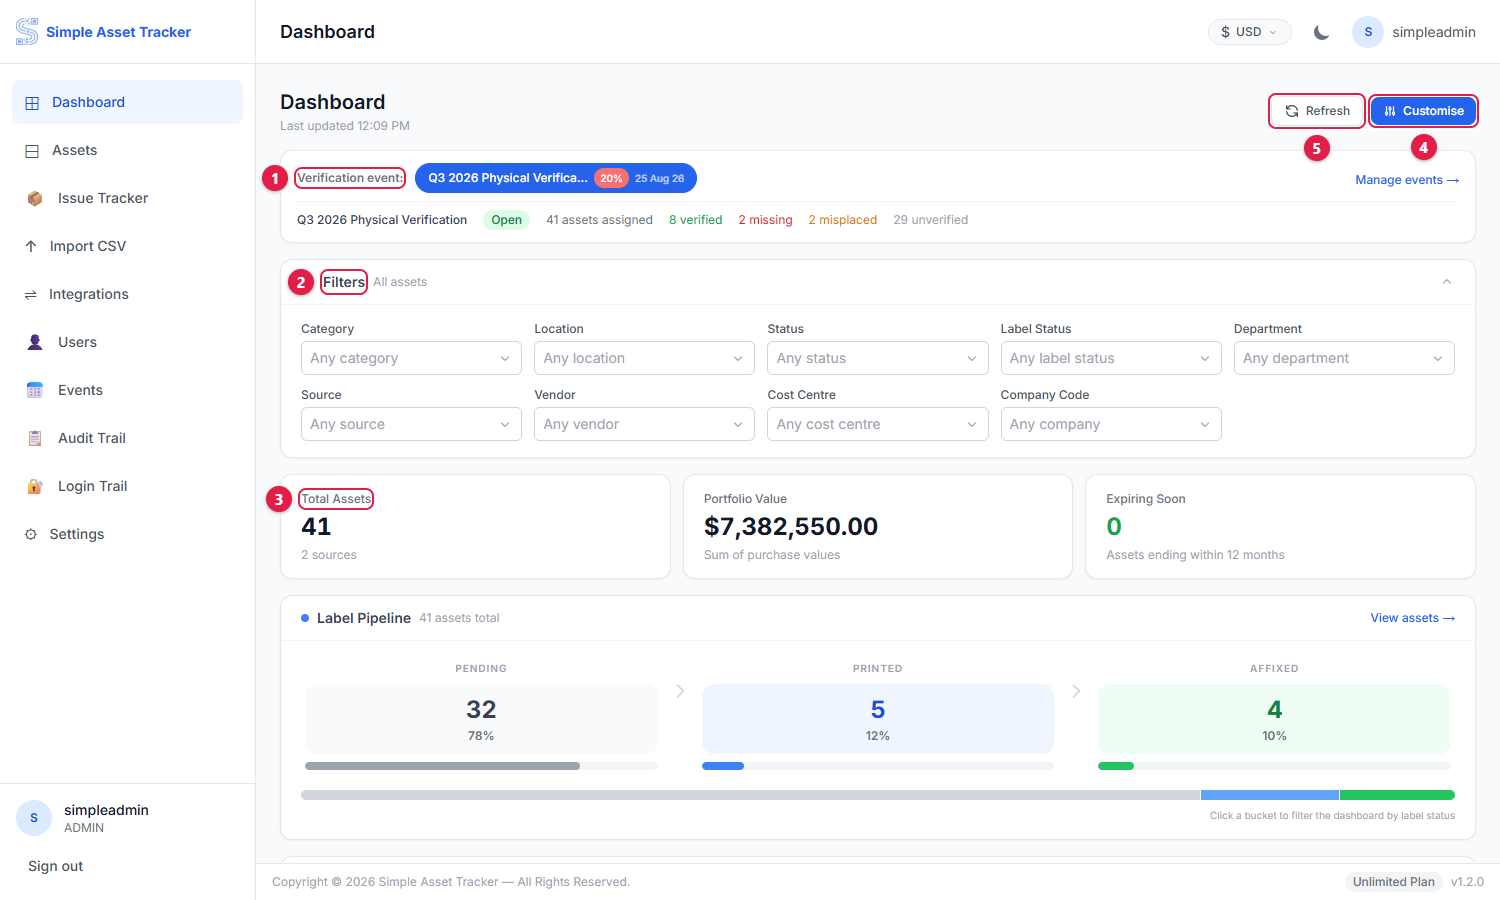
- 1.The verification event strip shows the event currently running and how far through it is.
- 2.Filters narrow everything below them — set a category or location and the totals follow.
- 3.Summary tiles show the number of assets, their combined purchase value, and how many are nearing end of life.
- 4.Customise chooses which panels appear and in what order.
- 5.Refresh re-reads the figures from the server.
Choosing what appears
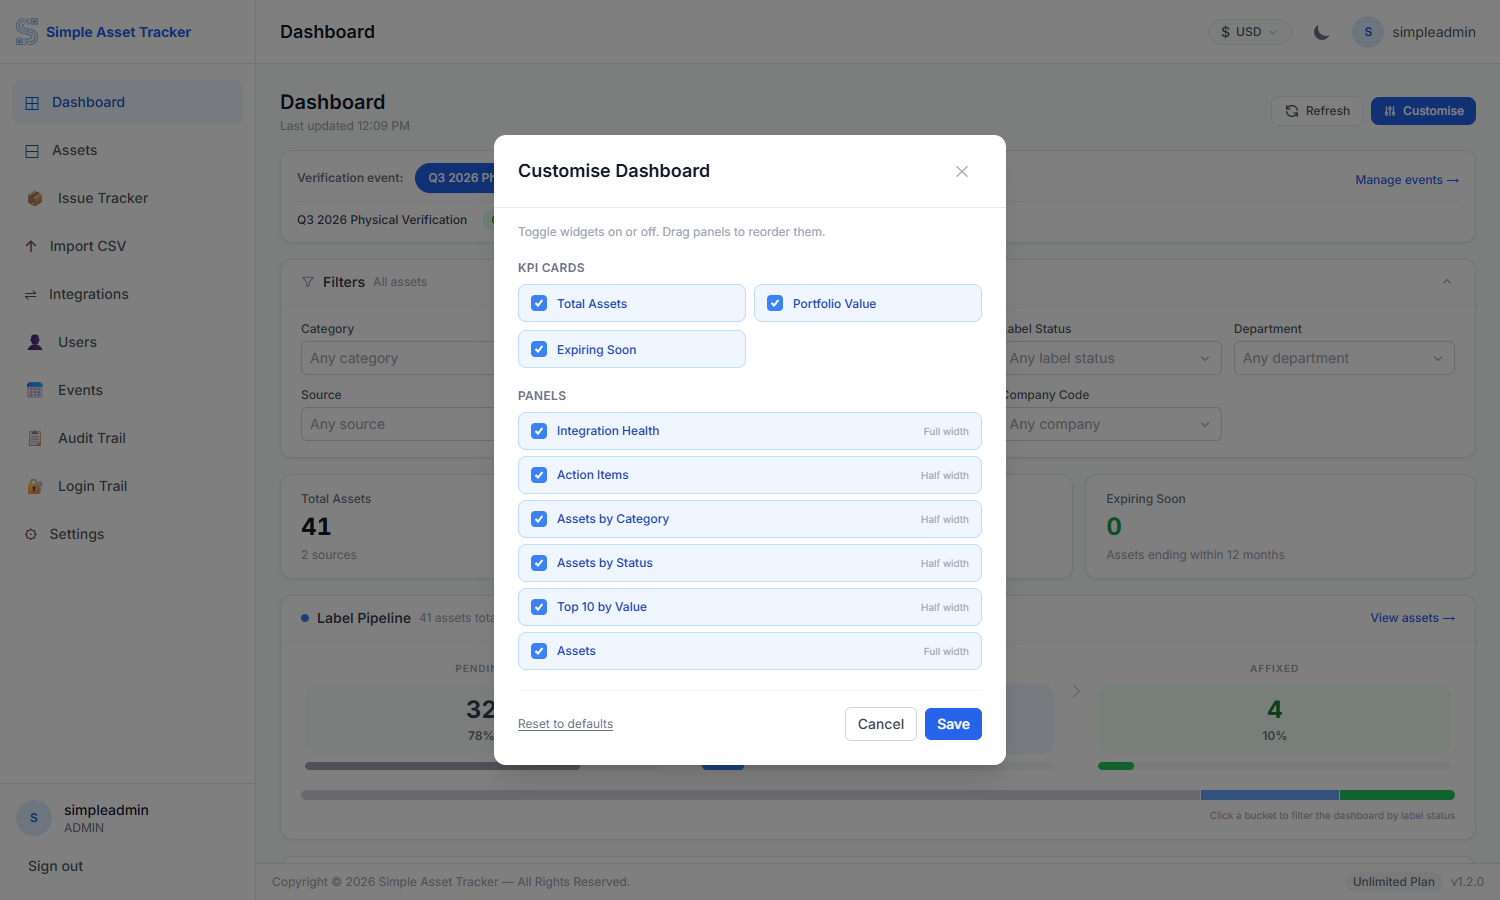
Turn panels on or off, then drag them into the order you want. The layout is remembered for your account, so each administrator can have their own arrangement.
Assets
This is the register itself, and where you will spend most of your time.
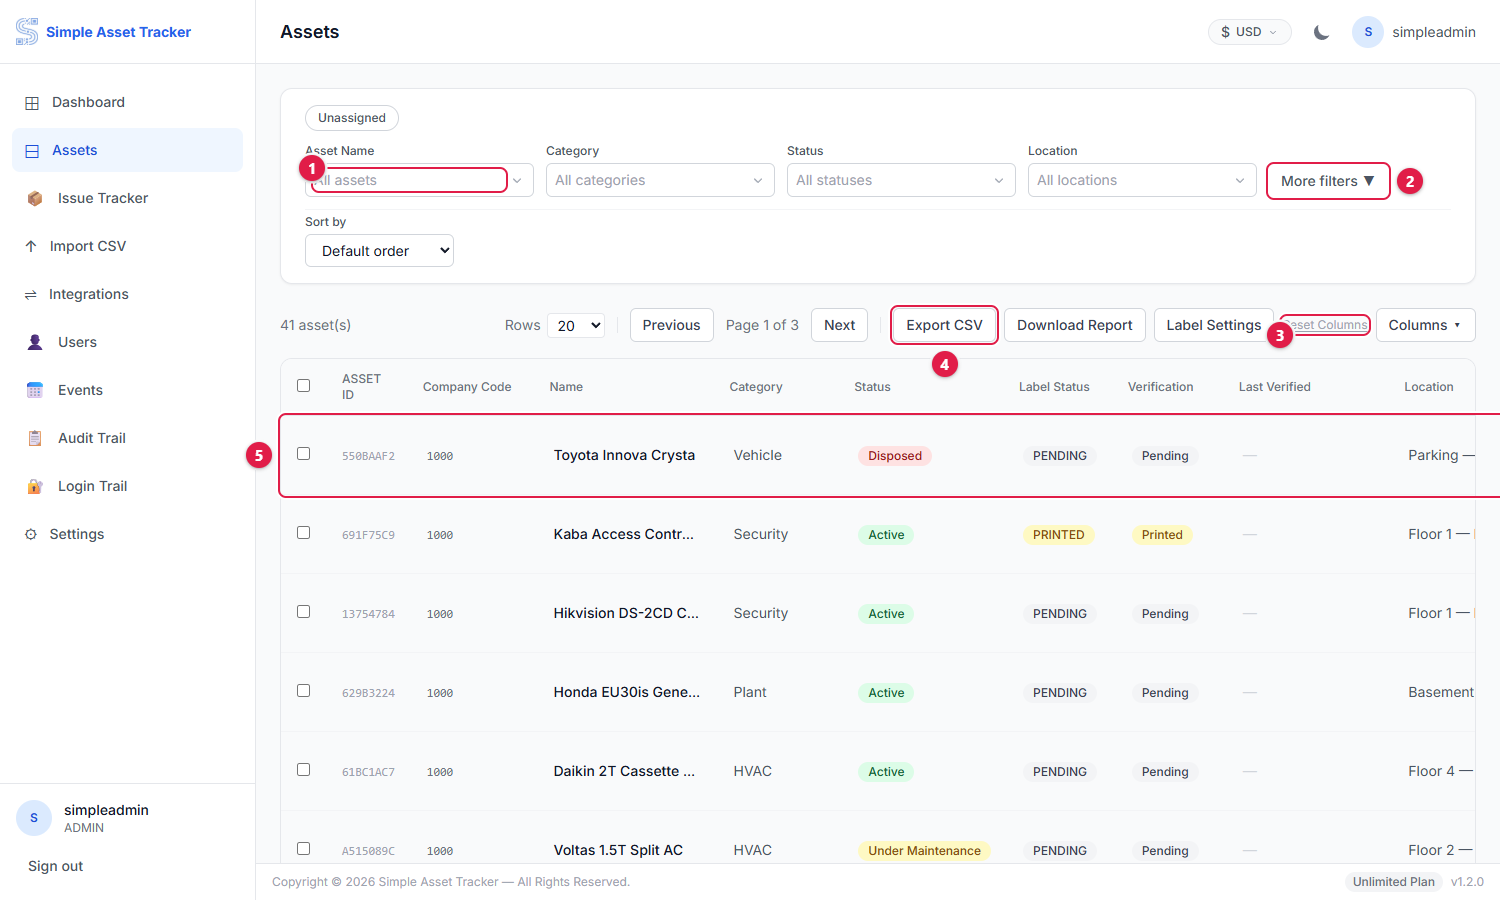
- 1.Search by asset name.
- 2.More filters opens the rest of the filter set — department, vendor, cost centre, company code, ERP ID, serial and tag numbers, label status and source.
- 3.Columns chooses which columns are shown; Reset Columns puts them back.
- 4.Export CSV downloads the whole register as a CSV with the same column headings as the import template, so it can be edited in a spreadsheet and imported back. Download Report produces a formatted Excel workbook of the full register, adding verification results and label print counts.
- 5.Each row is one asset. Scroll right for the Actions column, which holds Edit.
Working on several assets at once
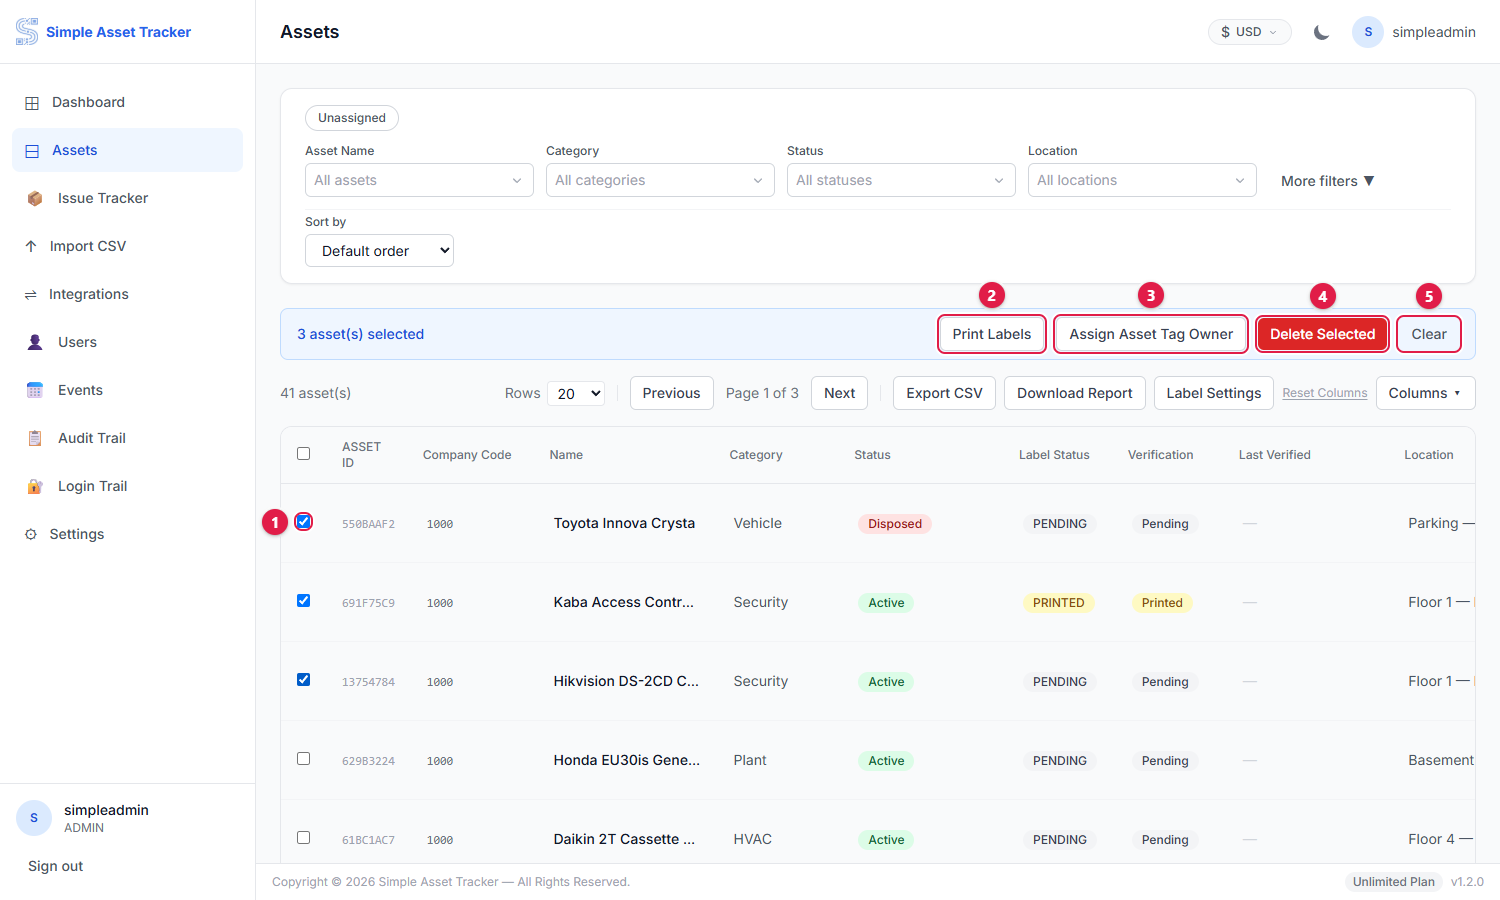
- 1.Tick the assets you want. The tick box in the header selects the whole page.
- 2.Print Labels opens a print window containing a label for every selected asset.
- 3.Assign Asset Tag Owner hands the selected assets to a member of staff for labelling.
- 4.Delete Selected removes them. This cannot be undone.
- 5.Clear drops the selection.
Label size and layout
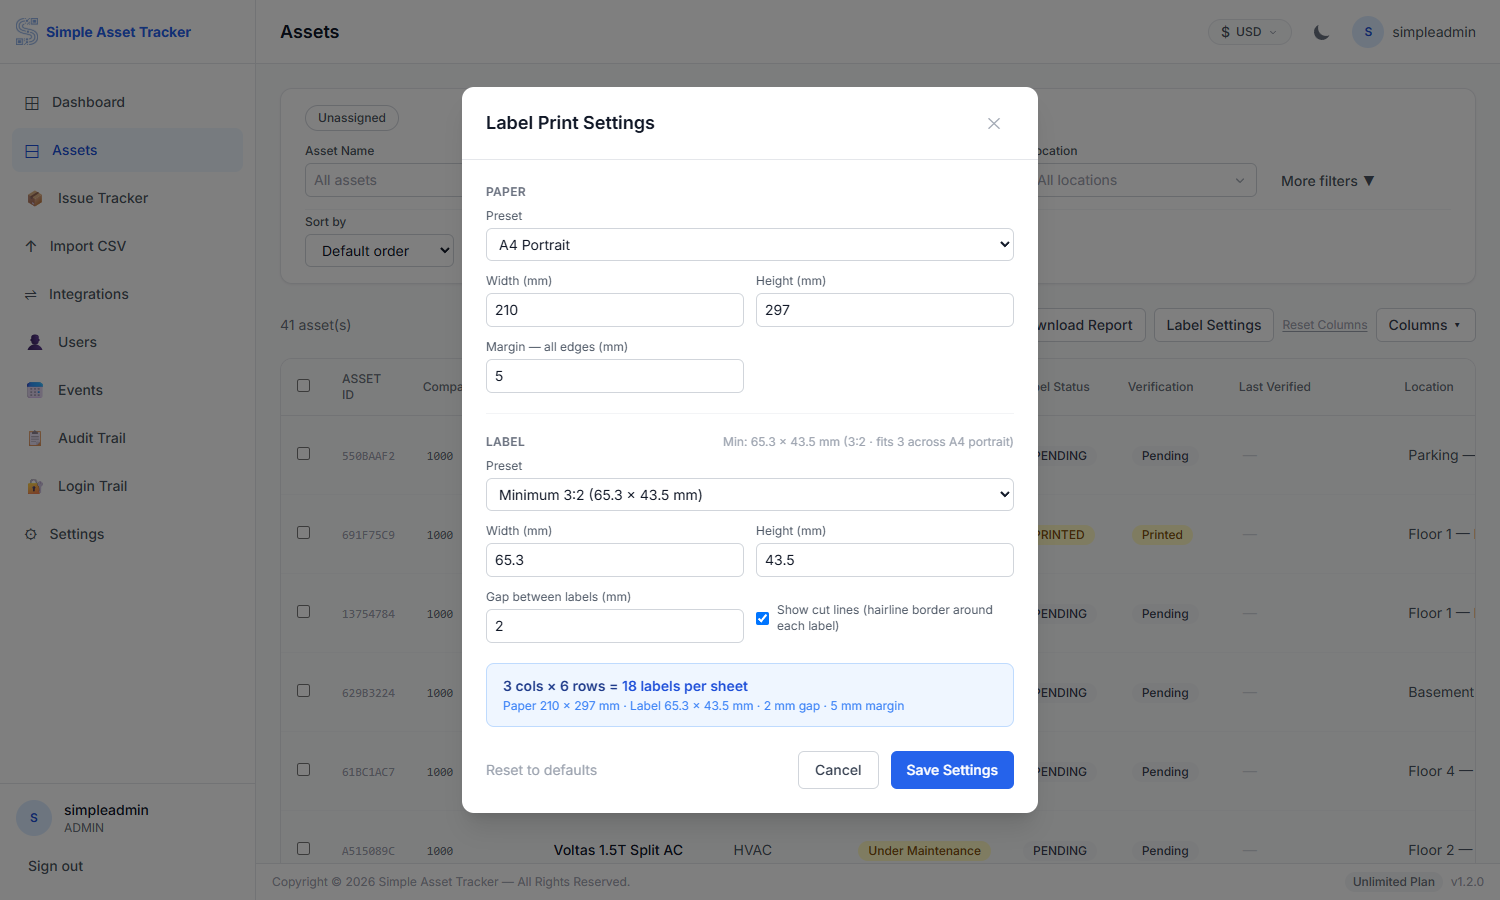
Label Settings controls the printed label: paper size and margins, label width and height, the gap between labels, and whether faint cut lines are drawn. The preview updates as you change the numbers. Set this up once, before you print your first sheet.
Each label shows the QR code, the asset name, its category, the tag number and the ERP ID. Location is not printed, because assets move and the label would then disagree with the register. Under Printed on labels you can add your company name to the top of every label; it applies to everyone who prints labels.
Editing an asset
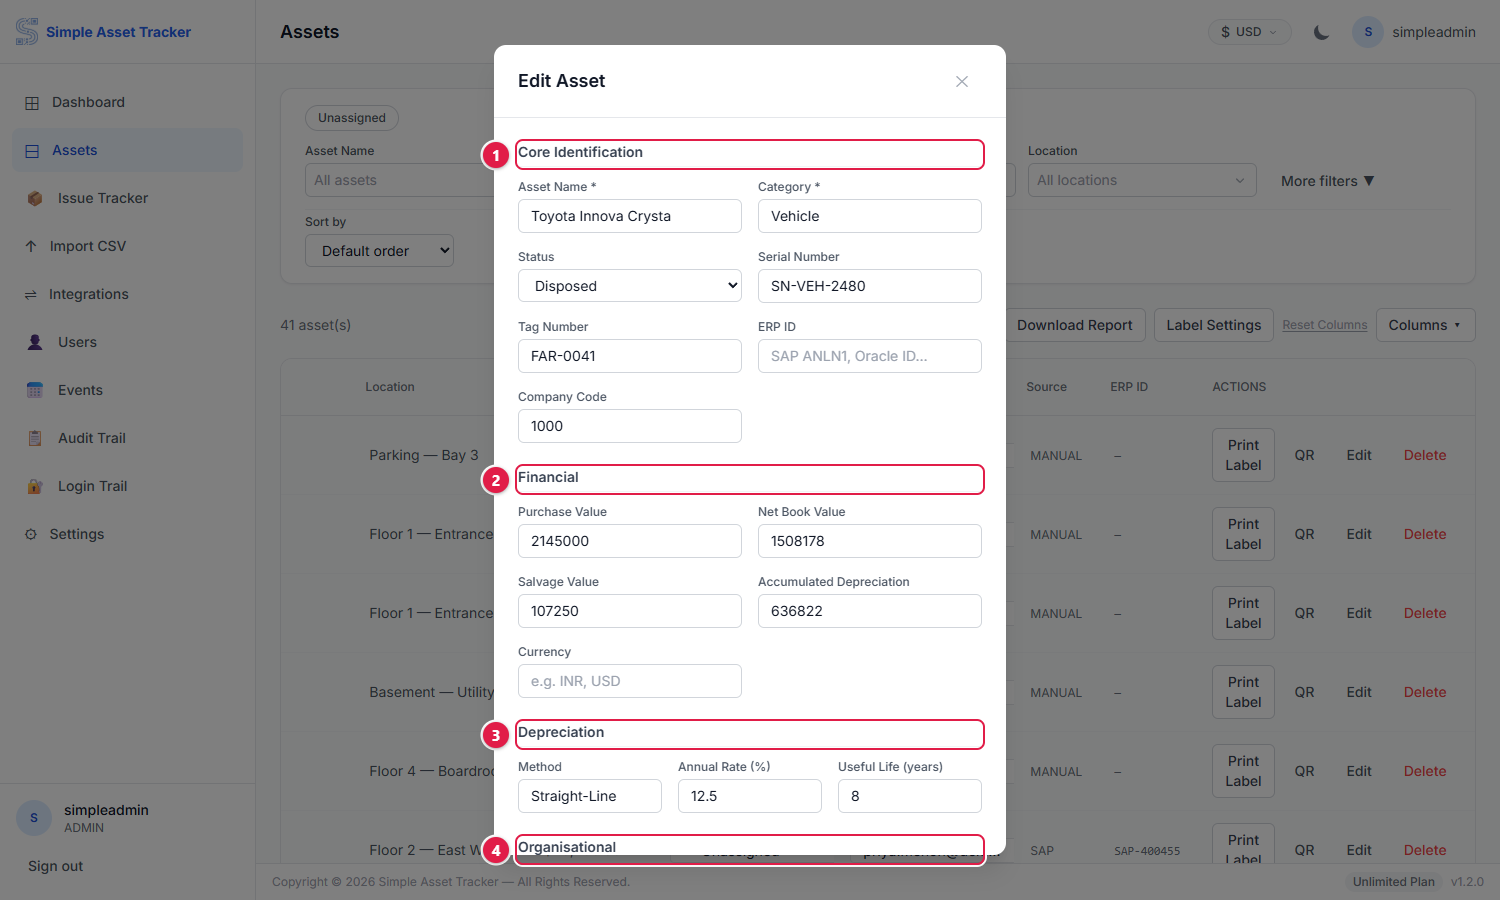
Click Edit on any row. The form is divided into four sections:
- 1.Core Identification — name, category, status, serial and tag numbers, ERP ID and company code.
- 2.Financial — purchase value, net book value, salvage value, accumulated depreciation, and the currency those amounts are recorded in (a three-letter code such as INR or USD).
- 3.Depreciation — method, annual rate and useful life.
- 4.Organisational — location, department, cost centre, assigned staff and vendor.
Status is one of Active, Inactive, Under Maintenance, Disposed, Sold Off or Written Off. When an import or an ERP sync brings in one of the last three, an alert is raised in the Issue Tracker so any staff member still holding the asset can be followed up. When an asset has its own currency, its detail page shows amounts in that currency instead of the currency chosen in the top bar.
Importing assets from a spreadsheet
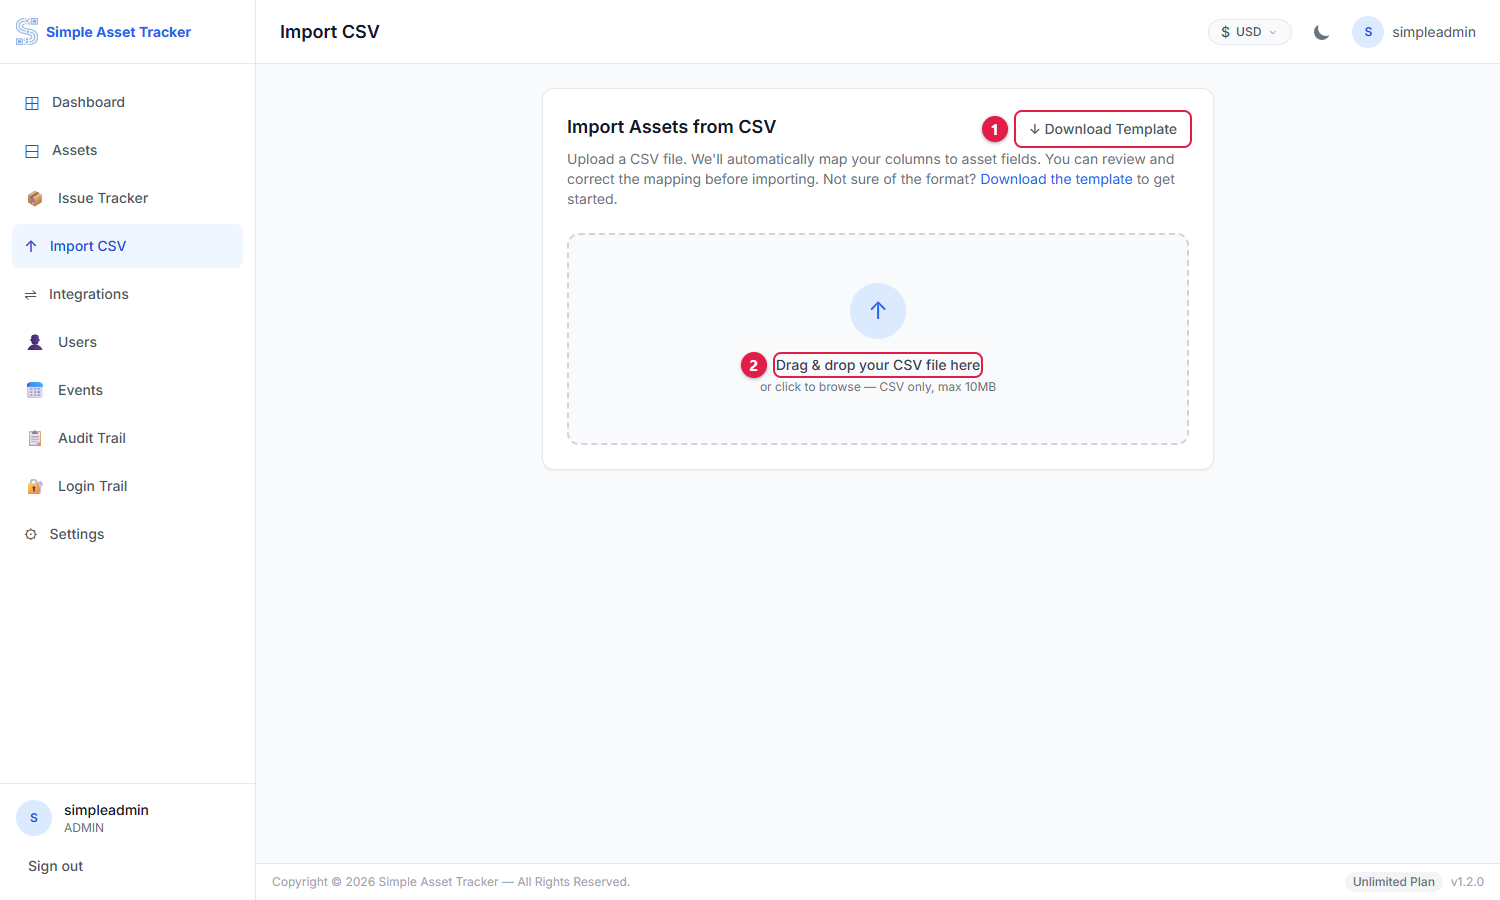
- 1.Download Template gives you a CSV with every importable column and one example row. Start here if you are building the file from scratch.
- 2.Drag your CSV onto the panel, or click it to browse. CSV only, up to 10 MB.
The template's columns are: Company Code, Asset Name, Category, Status, ERP ID, Serial Number, Tag Number, Purchase Value, Net Book Value, Salvage Value, Accumulated Depreciation, Currency, Depreciation Method, Depreciation Rate (%), Useful Life (Years), Purchase Date, Location, Department, Cost Centre, Assigned To, Assigned Verifier, Vendor and Quantity.
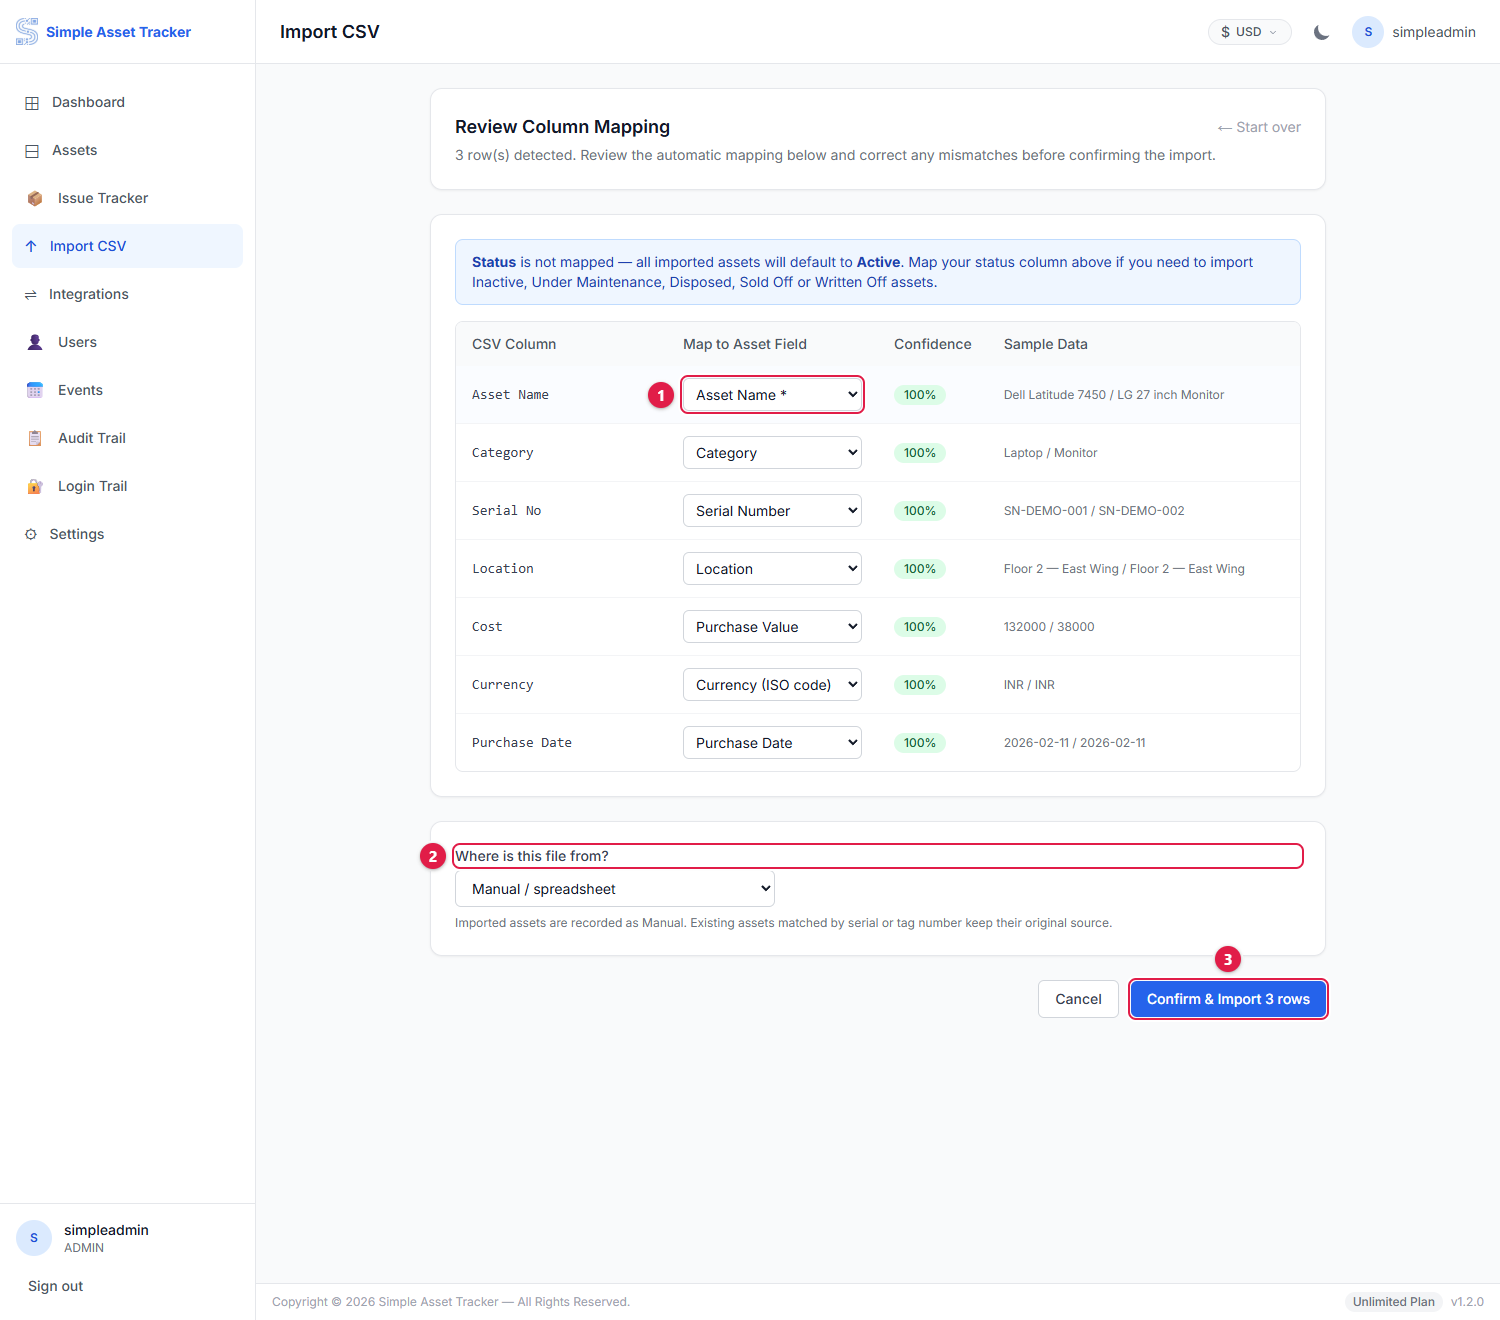
- 1.Your column headings do not have to match ours. Each heading is matched to the closest asset field, with a confidence score. Correct anything guessed wrongly, or choose Skip this column.
- 2.Where is this file from? Leave this as Manual / spreadsheet unless the file is an extract from SAP, Oracle Fusion or Zoho Books. In that case, choose the ERP so the assets are recorded under it (see below).
- 3.Confirm & Import. A summary then shows how many assets were created and updated, any rows that could not be imported, and any values that were skipped.
- Only Asset Name is mandatory — it is marked with an asterisk.
- A column left unmapped is ignored.
- If you do not map Status, every imported asset is created as Active.
- Rows carrying a quantity greater than one are expanded into that many individual assets, each numbered so you can label them separately. Values such as Purchase Value are copied to every unit, so enter them per unit.
- Dates are best written as YYYY-MM-DD. The formats 15.01.2023, 15-JAN-23, 15 Jan 2023, Jan 15, 2023, Excel date numbers, and 15/01/2023 or 01/15/2023 are also accepted. For slash dates, the whole column decides whether the day or the month comes first. If nothing in the column settles it, the day is taken as first. A date that cannot be read is left blank and listed in the summary; the rest of the row is still imported.
- Useful life given in months (for example Oracle's Life in Months) is converted to whole years.
Re-importing and updating
Importing a file again updates the assets it already created instead of duplicating them. Each row is matched to an existing asset by ERP ID first, then serial number, then tag number, and finally by name for assets that have none of these. A matched asset keeps its QR code, label status and print counts.
- A CSV exported from the Assets page can be edited and imported straight back. Columns the application manages itself — Asset ID, Label Status, Source, Unit Number and Unit Total, verification results, print counts and Last Synced At — are recognised and skipped automatically.
- An import never changes where an existing asset came from. If a row matches an asset that an ERP sync created, its details are updated, but it stays linked to the ERP, so the next sync still recognises it rather than creating a duplicate.
Importing an ERP extract
You can import a register exported straight from SAP, Oracle Fusion or Zoho Books. Their own column headings are recognised — for example SAP's Asset, Capitalized on, Acquis.val., Accum.dep., Book val. and Inventory number; Oracle's Asset Number, Date Placed in Service, Cost, Depreciation Reserve and Life in Months; and Zoho's Asset Cost, Current Asset Value, Fixed Asset Type and Serial No. ERP columns with no matching asset field, such as SAP's Subnumber or Oracle's Units, are left unmapped.
| Source chosen | ERP ID format a later live sync will recognise |
|---|---|
| SAP S/4HANA | CompanyCode-Asset-Subnumber, e.g. 1010-10001234-0 |
| Oracle Fusion | BOOK:AssetNumber, e.g. US CORP:100245 |
| Zoho Books | Zoho's internal fixed asset ID (not the FA-00001 asset number) |
Issue Tracker
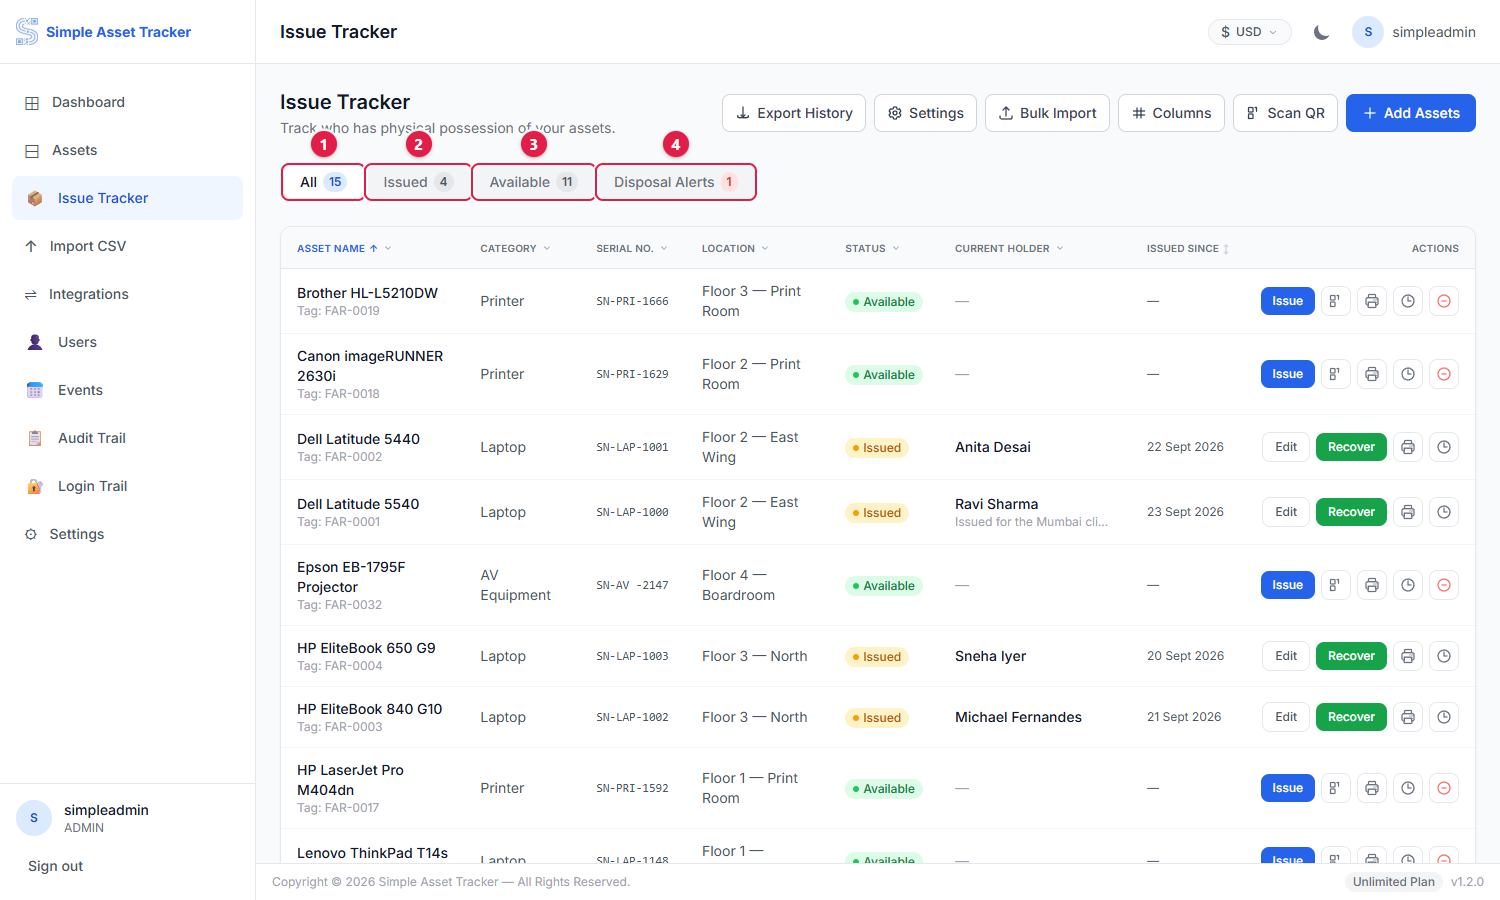
The Issue Tracker records who is physically holding an asset. Administrators see the same screen as the Issue Tracker role, plus the settings that control it.
- 1.All — every asset enrolled in the tracker.
- 2.Issued — assets currently out with someone.
- 3.Available — enrolled and on the shelf.
- 4.Disposal Alerts — assets an ERP sync or CSV import has marked as disposed, sold off or written off while somebody still holds them.
As an administrator you also control which details are compulsory when an asset is issued — employee ID, employee email, serial number — through the tracker's settings. The day-to-day issuing and recovery workflow is described in the User Guide.
Users
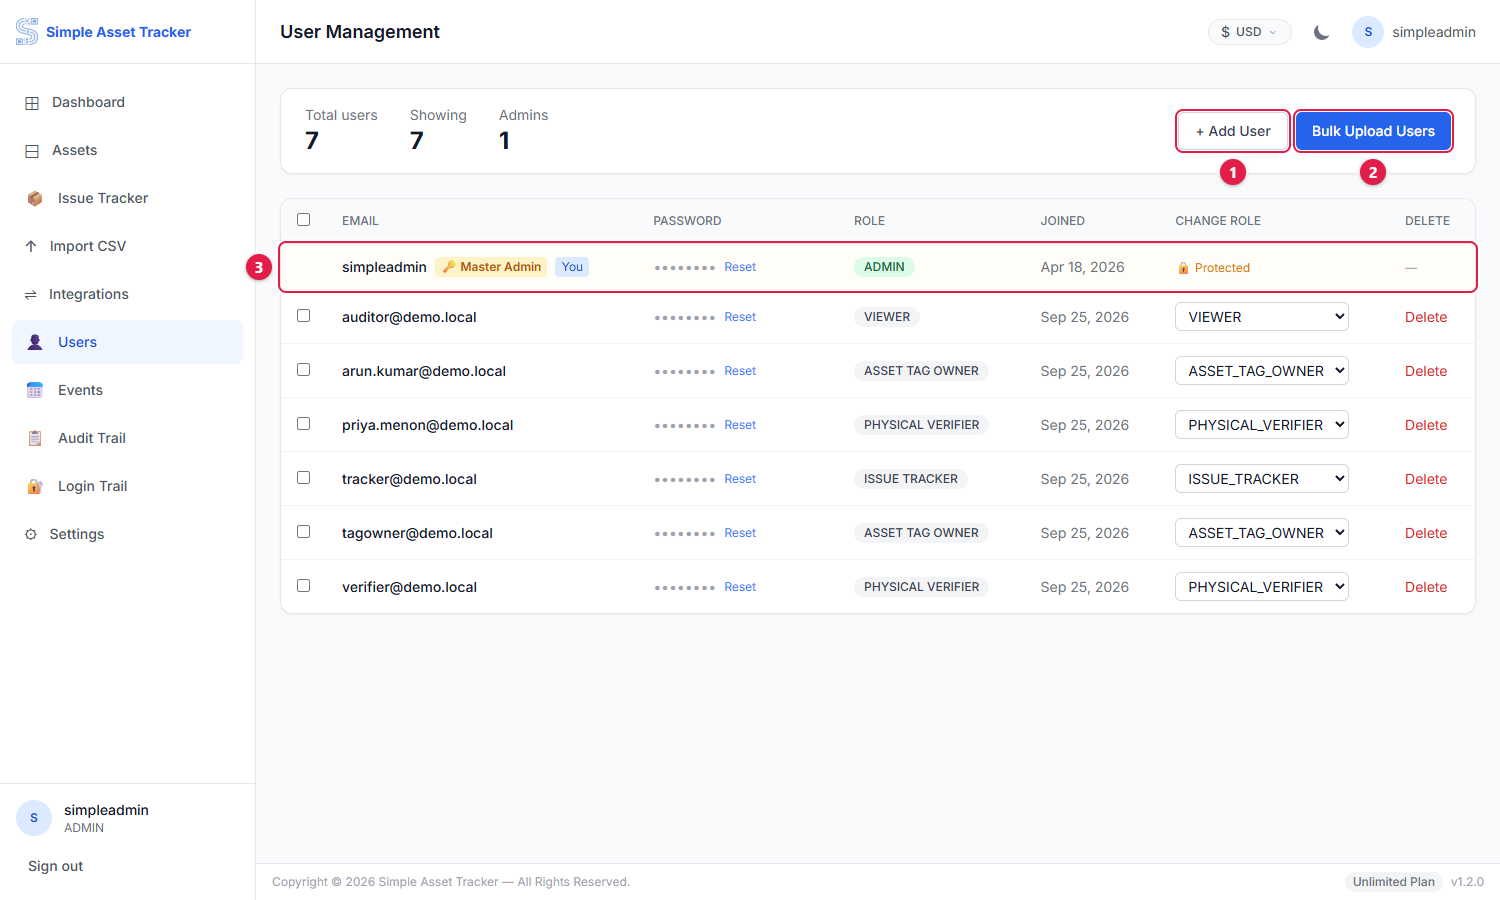
- 1.Add User creates a single account.
- 2.Bulk Upload creates many at once from a CSV of email, password and role.
- 3.Each row shows the account, its role, and the actions available on it.
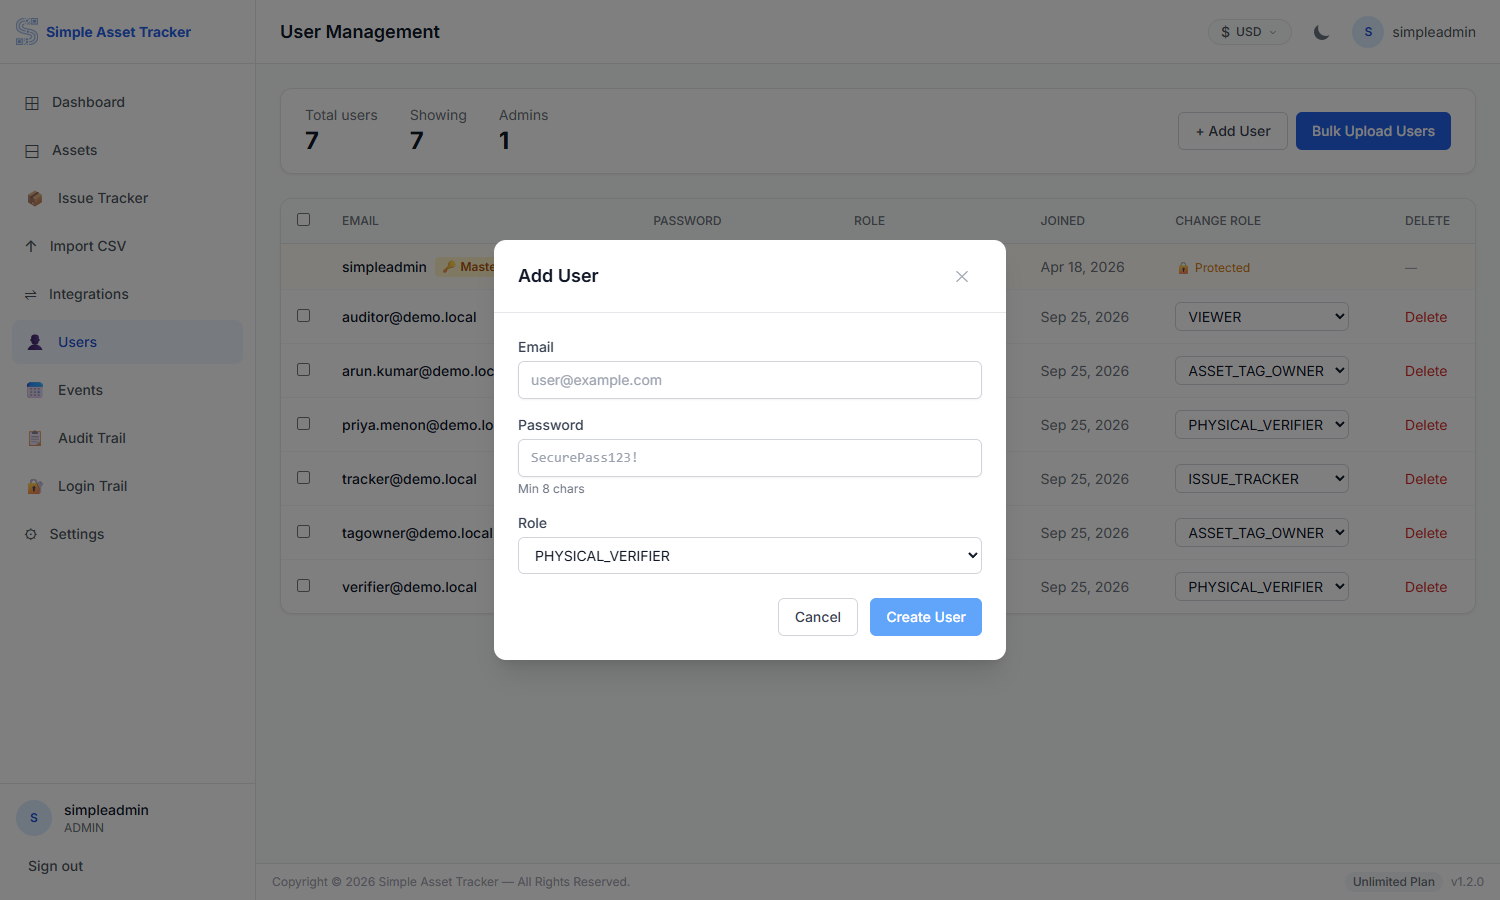
Give the person an email address, a starting password, and the role they need.
Rules that protect the master account
- Only the master administrator can create, edit or delete other Administrator accounts.
- The master administrator's role cannot be changed and the account cannot be deleted.
- Only the master administrator can change their own password.
- You cannot change your own role or delete your own account.
- Passwords must be at least eight characters and must not be an obvious choice.
Verification events
An event is one round of physical checking — a quarterly count, an audit, a move. You create the event, decide who checks what, and watch the results arrive.
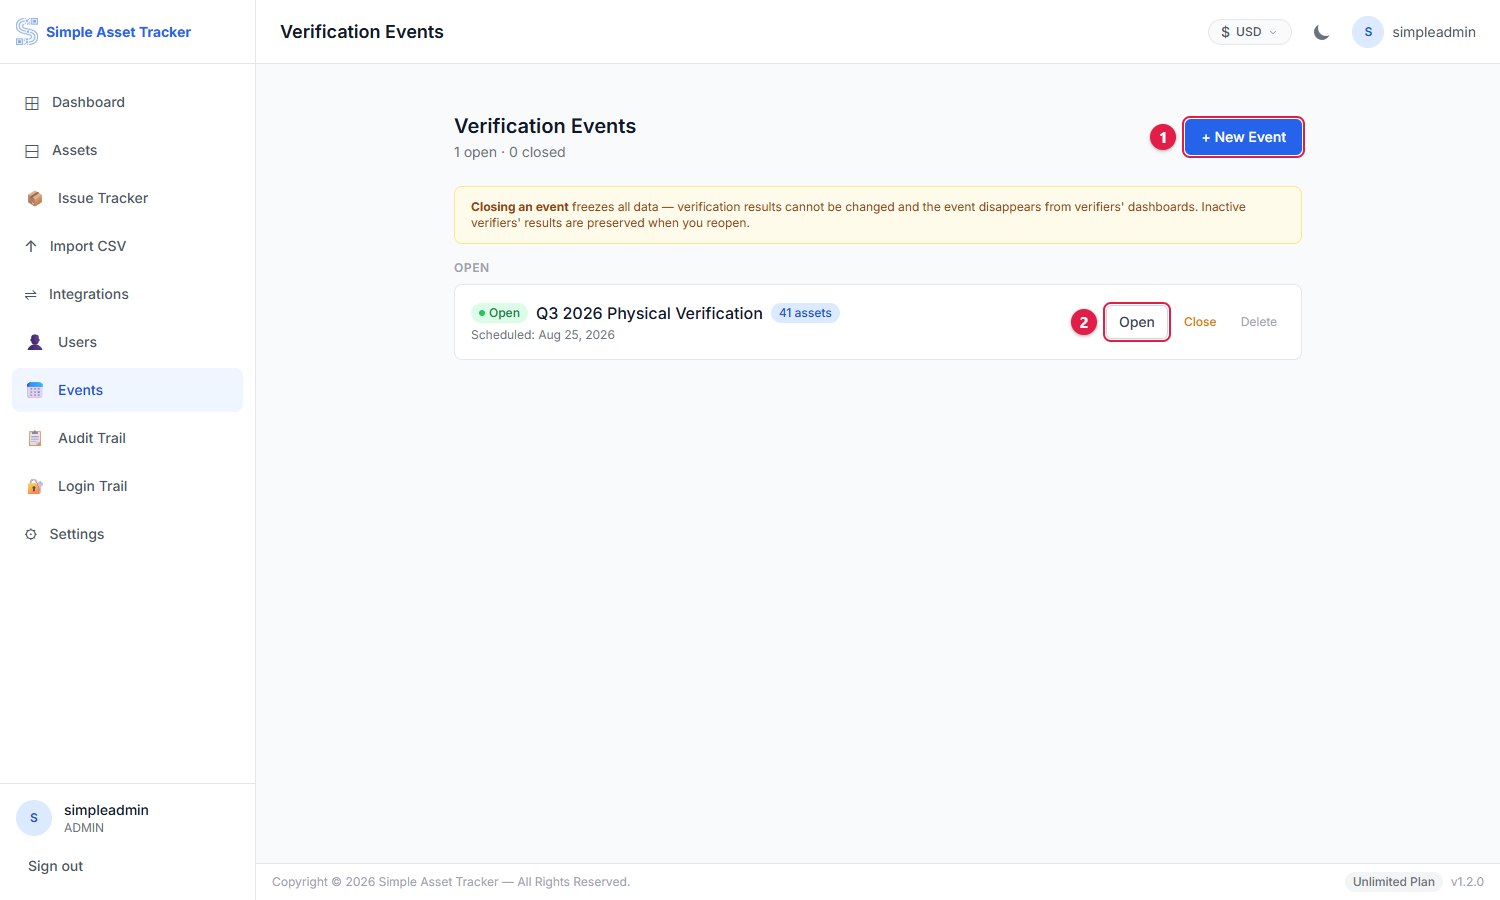
Each event is either Open or Closed. Verifiers only see assets from an Open event, so an event that is still being prepared will not appear on anyone's phone until you open it.
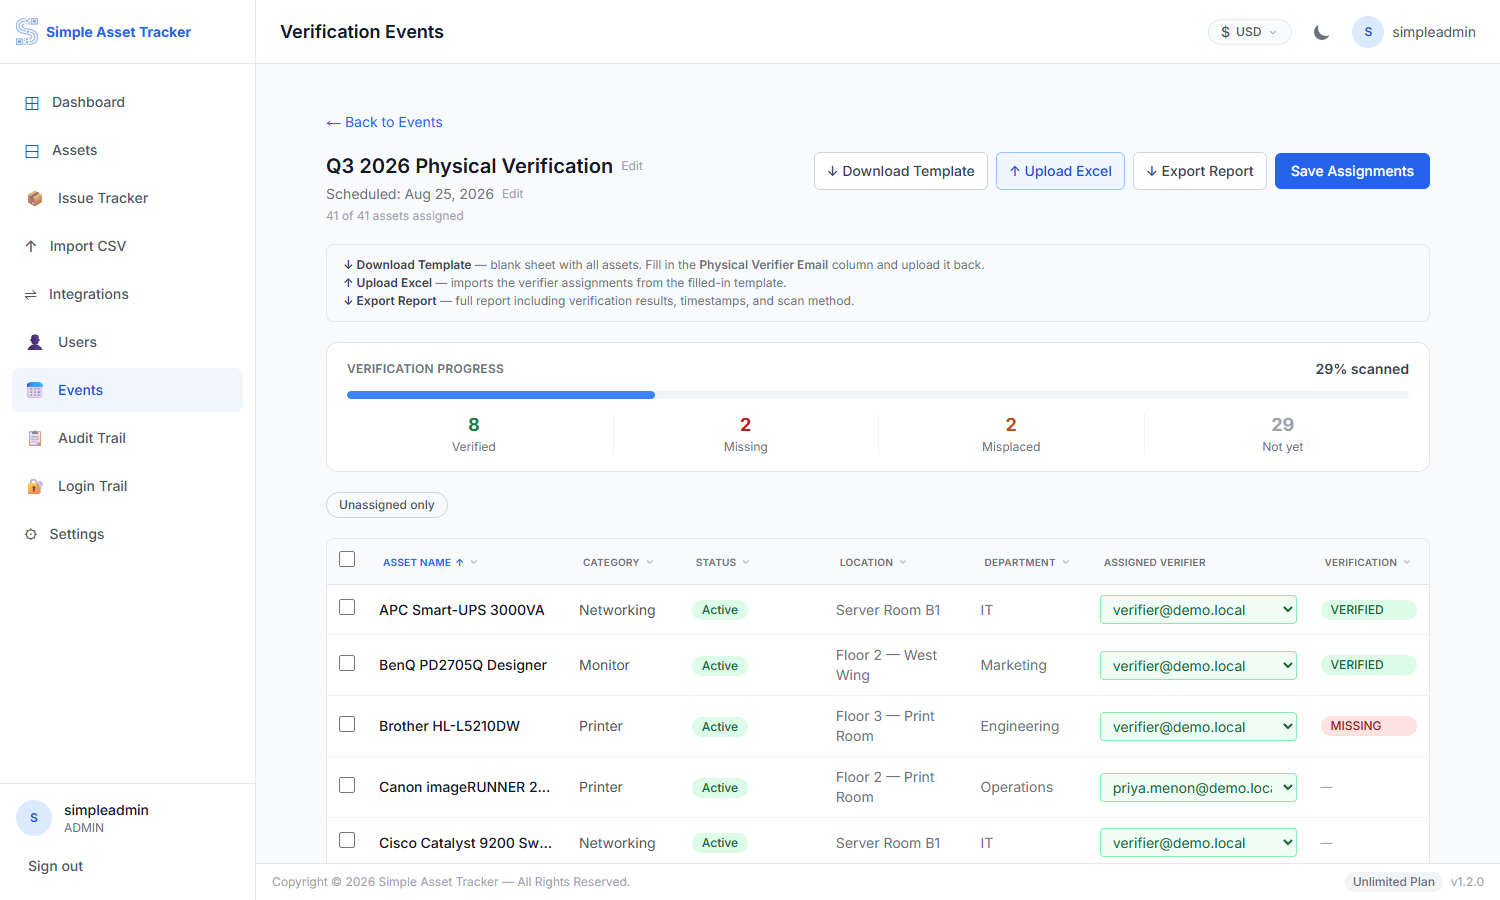
Inside an event you can:
- Assign assets to verifiers, individually or in bulk. Assets registered after the event started can be added too; they are marked Added after start, so you can see what joined the round late.
- Export the assignment list, edit it in Excel, and import it back — useful for large rounds.
- Watch live progress: how many are verified, missing, misplaced or still untouched.
- See anything verifiers found that is not on the register. Trace each one to a purchase invoice or transfer document so finance can decide how to record it, then mark it followed up with a note on what was done. Followed-up finds stay on the list and can be reopened.
- Export the results: one row per asset in the event, with its tag number and whether it was added after the start, plus a Not on register sheet listing every find and whether it has been followed up, by whom and with what note.
- Close the event when the round is finished, and reopen it if something was missed.
Integrations
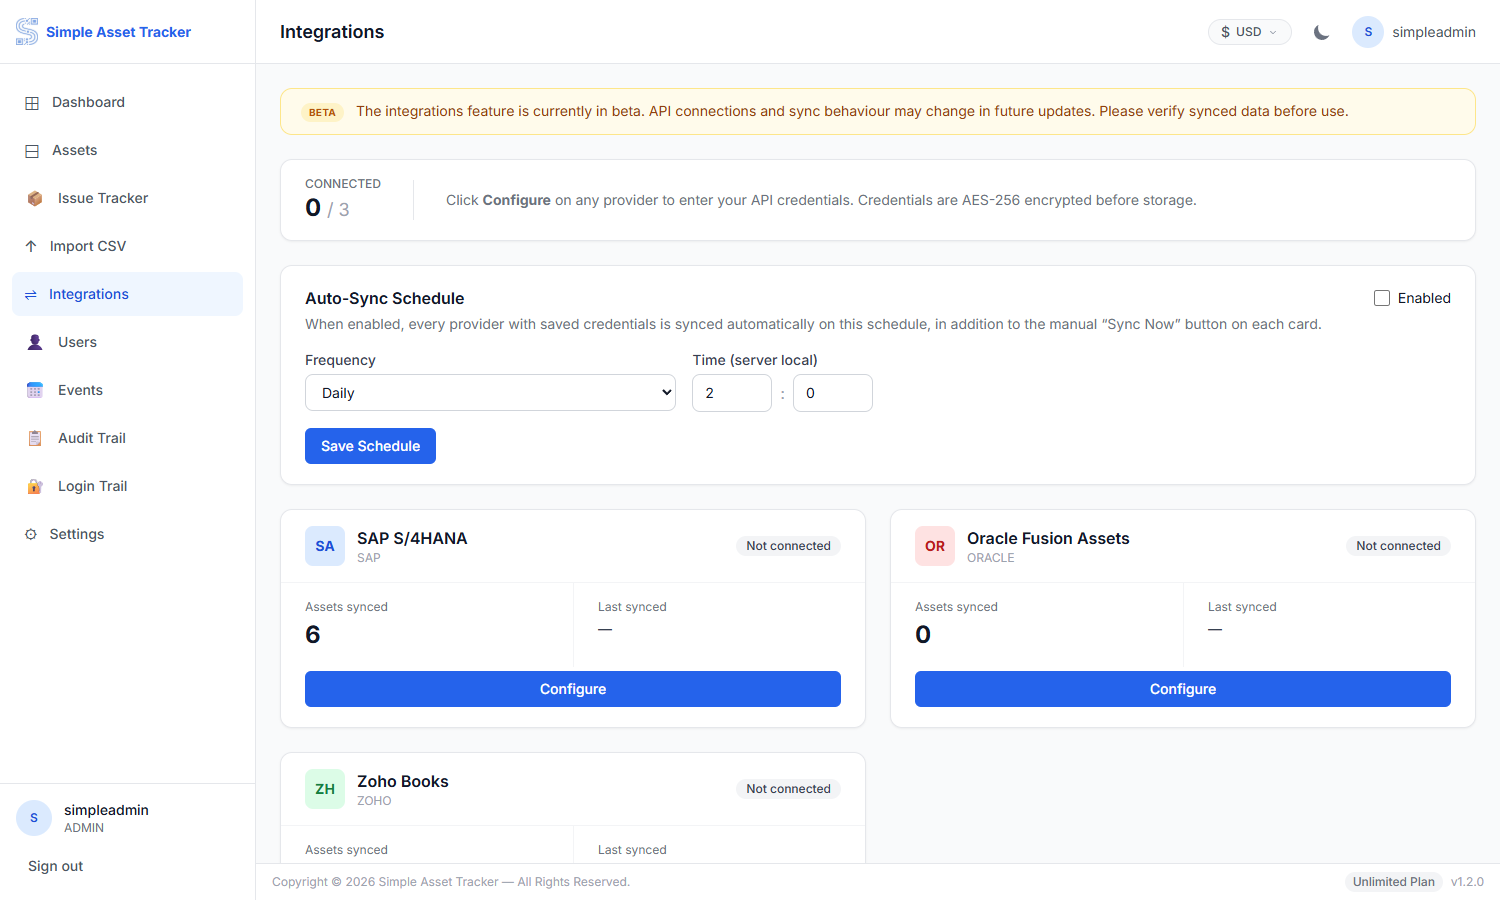
Simple Asset Tracker can pull asset records from SAP S/4HANA, Oracle Fusion and Zoho Books. Each provider card shows whether it is configured, how many assets came from it, and when it last synchronised.
- 1.Open the provider you want and enter its credentials.
- 2.Use Test Connection to confirm the details before relying on them.
- 3.Run a sync. Imported assets are tagged with that provider as their source.
A sync is safe to repeat: assets it has brought in before are updated, never duplicated. Values the ERP supplies are refreshed on every sync, because the ERP is the system of record. Fields the ERP does not supply, such as Location for a Zoho asset, are left as you set them. Each asset's company code and currency are filled in from the ERP.
| System | What a sync fills in |
|---|---|
| SAP S/4HANA | Name, asset class (as category), status, serial and inventory (tag) numbers, company code, currency, salvage value, depreciation key and useful life, capitalisation date, location or plant, cost centre, department and vendor. |
| Oracle Fusion | Everything your extract report provides: cost, net book value, accumulated depreciation, salvage value, method, rate, life, date placed in service, location, department, cost centre, assignee, vendor, serial and tag numbers, retirement status and the book's currency. |
| Zoho Books | Name, fixed asset type (as category), status, serial number, cost, current value, accumulated depreciation, salvage value, method, rate, useful life, purchase date and the organisation's currency. Zoho has no location, department or vendor fields on fixed assets. |
What has to be set up in the ERP first
Pasting credentials into the Integrations page is only half the job. The other half happens inside the ERP itself, and usually needs your ERP administrator or finance systems team rather than you. Take this section to them before you start.
Per system
| System | Sign-in method | What must exist in the ERP before you can connect |
|---|---|---|
| SAP S/4HANA | OAuth2, Basic, or API Key — see below | The OData V4 service API_FIXEDASSET activated and exposed via a Communication Arrangement, and a user or OAuth client with read authorisation on Fixed Asset master data and the depreciation-area valuation entities. The company code and depreciation area whose values you want. |
| Oracle Fusion | Username and password, plus an Asset Book | A BI Publisher report (.xdo) your Oracle admin builds and publishes, since Oracle Fusion has no plain REST list endpoint for fixed assets. A service account holding the Financials Assets REST and BI Publisher report-execution duty roles. |
| Zoho Books | OAuth 2.0 | The Fixed Assets module enabled in Zoho Books. A Server-based Application registered at the Zoho API Console for your data centre, and a refresh token generated from it with the scopes ZohoBooks.fixedasset.READ and ZohoBooks.settings.READ (requested with access_type=offline). |
SAP: choosing an authentication mode
SAP is the one provider with a choice to make. Pick the mode that matches how your tenant is set up — the fields on the Integrations page change depending on which you select.
| Mode | When to use it | Fields it asks for |
|---|---|---|
| OAuth2 Client Credentials | Recommended. Required for S/4HANA Cloud production tenants. | OAuth Client ID, OAuth Client Secret, OAuth Token URL |
| Basic (username & password) | On-premise systems only. | Username, Password |
| API Key | SAP Business Accelerator Hub sandbox only — will not authenticate against a real production tenant. | API Key |
Zoho: the scopes matter
Where each value comes from
The left column is the box on the Integrations page; the right is where your ERP team finds it.
| System | Field in the app | Where it comes from |
|---|---|---|
| SAP | Base URL | Root URL of your S/4HANA Gateway/BTP tenant, e.g. https://my123456.s4hana.ondemand.com — no trailing slash. |
| SAP | Company Code | The company code to pull, e.g. 1000. Defaults to 1000 if left blank — confirm with your SAP FI team if unsure. |
| SAP | Depreciation Area | Which depreciation area's values to read. Default '01' is the standard book/local-GAAP area on most tenants — confirm with your FI-AA team if your chart of depreciation differs. |
| SAP (OAuth2 mode) | OAuth Client ID / Secret / Token URL | Issued when your Basis team creates the OAuth client under Communication Arrangement SAP_COM_0A93. The Token URL is that arrangement's token endpoint. |
| SAP (Basic mode) | Username / Password | The read-only SAP dialog user created for this purpose. On-premise systems only. |
| SAP (API Key mode) | API Key | From the SAP API Business Accelerator Hub sandbox (sandbox.api.sap.com) — not valid against a real production tenant. |
| Oracle | Instance URL | Root URL of the Oracle Cloud instance, no trailing slash. |
| Oracle | Username / Password | A service account with fixed-assets read access (see prerequisites above). |
| Oracle | Asset Book | Required — Oracle assets are book-scoped, so cost, NBV and depreciation all differ per book. Find valid values under Setup and Maintenance → Manage Asset Books. |
| Oracle | BI Publisher Report Path | Catalog path to the asset extract report your Oracle admin publishes. Optional — falls back to a default path if left blank. |
| Oracle | Report Output Format | csv or xml — must match the report's configured output layout. Default: csv. |
| Oracle | Report Book Parameter Name | The parameter name your report uses for book scoping. Default: P_BOOK_TYPE_CODE. |
| Oracle | Extra Report Parameters | Optional additional parameters your report requires, semicolon-separated as NAME=VALUE. |
| Zoho | Client ID | Zoho API Console, from the registered application |
| Zoho | Client Secret | Zoho API Console, alongside the Client ID |
| Zoho | Refresh Token | Produced by the one-time OAuth authorisation flow, with scopes ZohoBooks.fixedasset.READ and ZohoBooks.settings.READ |
| Zoho | Organization ID | Zoho Books, under Settings → Organization Profile — a numeric ID. It is also recorded as the company code of every Zoho asset. |
| Zoho | Accounts URL | Your data centre: .com, .eu, .in, .com.au, .jp or .ca |
Network access
Syncs are made outbound from the machine running Simple Asset Tracker. If that server sits behind a firewall or proxy, these destinations need to be reachable over HTTPS on port 443.
| System | Destination |
|---|---|
| SAP | Your own S/4HANA host (the Base URL above), plus — in OAuth2 mode — the OAuth Token URL host issued with your Communication Arrangement. |
| Oracle | Your own Oracle Cloud instance (the Instance URL above) |
| Zoho | accounts.zoho.com and www.zohoapis.com, or your data centre's equivalents (e.g. accounts.zoho.in and www.zohoapis.in) |
Keeping the connection alive
- Zoho refresh tokens do not expire, but they are revoked if the application is deleted or its scopes are changed in the API Console.
- SAP Basic/API Key modes and Oracle use ordinary user accounts, so a password or key expiry policy will stop syncing. Ask for an account exempt from routine expiry, or diarise the change.
- SAP OAuth2 client secrets don't expire on a fixed schedule, but they can be revoked if the Communication Arrangement is deauthorised at the SAP end — Test Connection is the fastest way to catch that.
Audit Trail and Login Trail
Two separate records answer two different questions: what was changed, and who came in. Between them they cover most of what an auditor will ask for.
Audit Trail
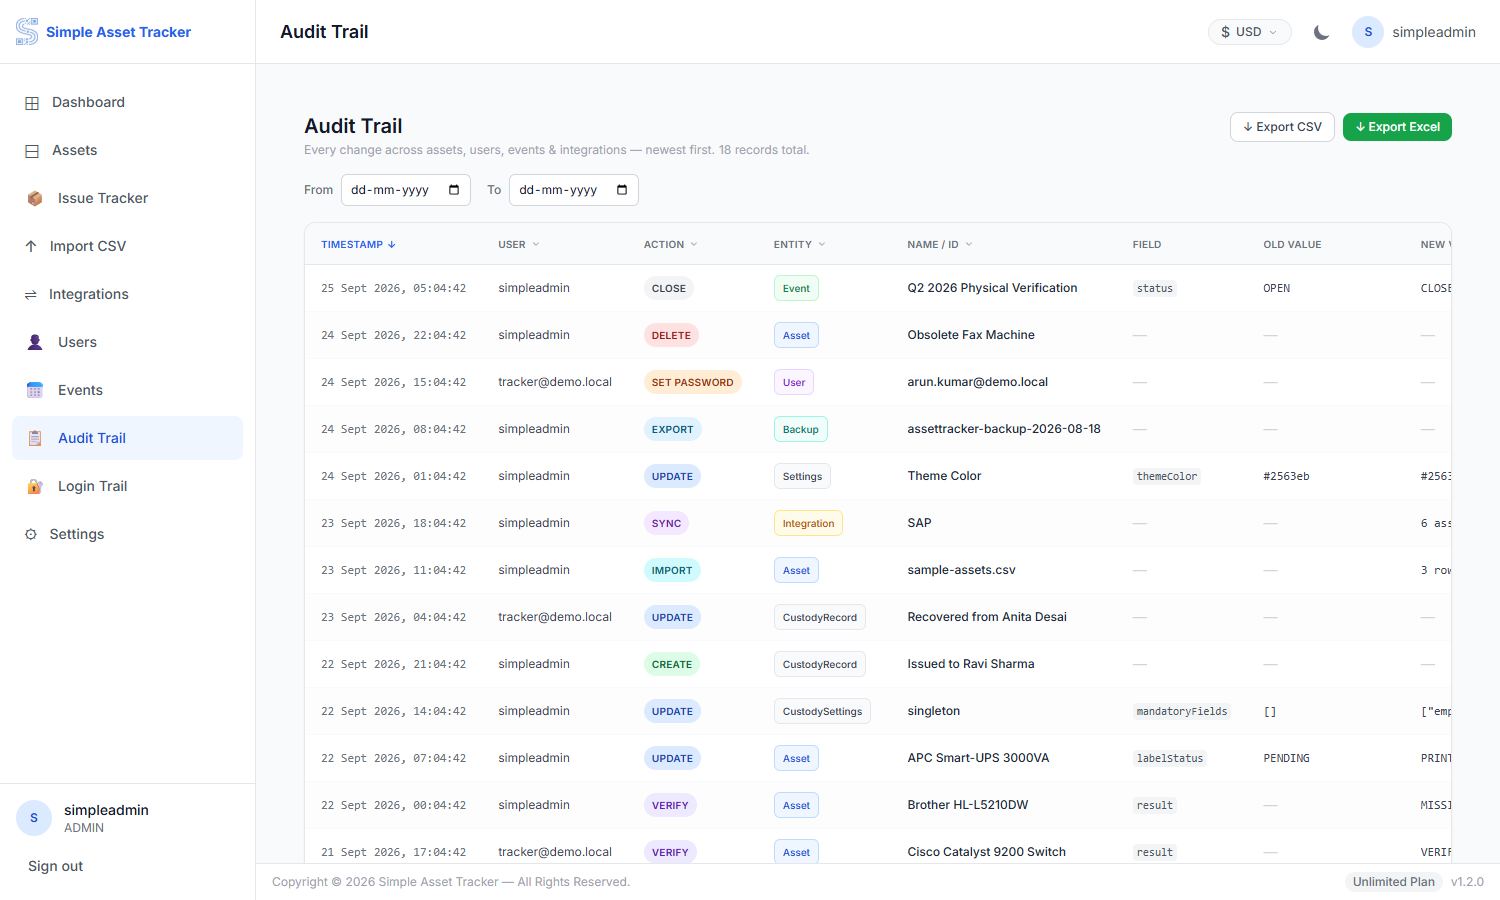
Every change is recorded here: what was changed, by whom, when, and the old and new values. Filter by action, entity or date range, and export the result to Excel or CSV when an auditor asks for it.
Login Trail
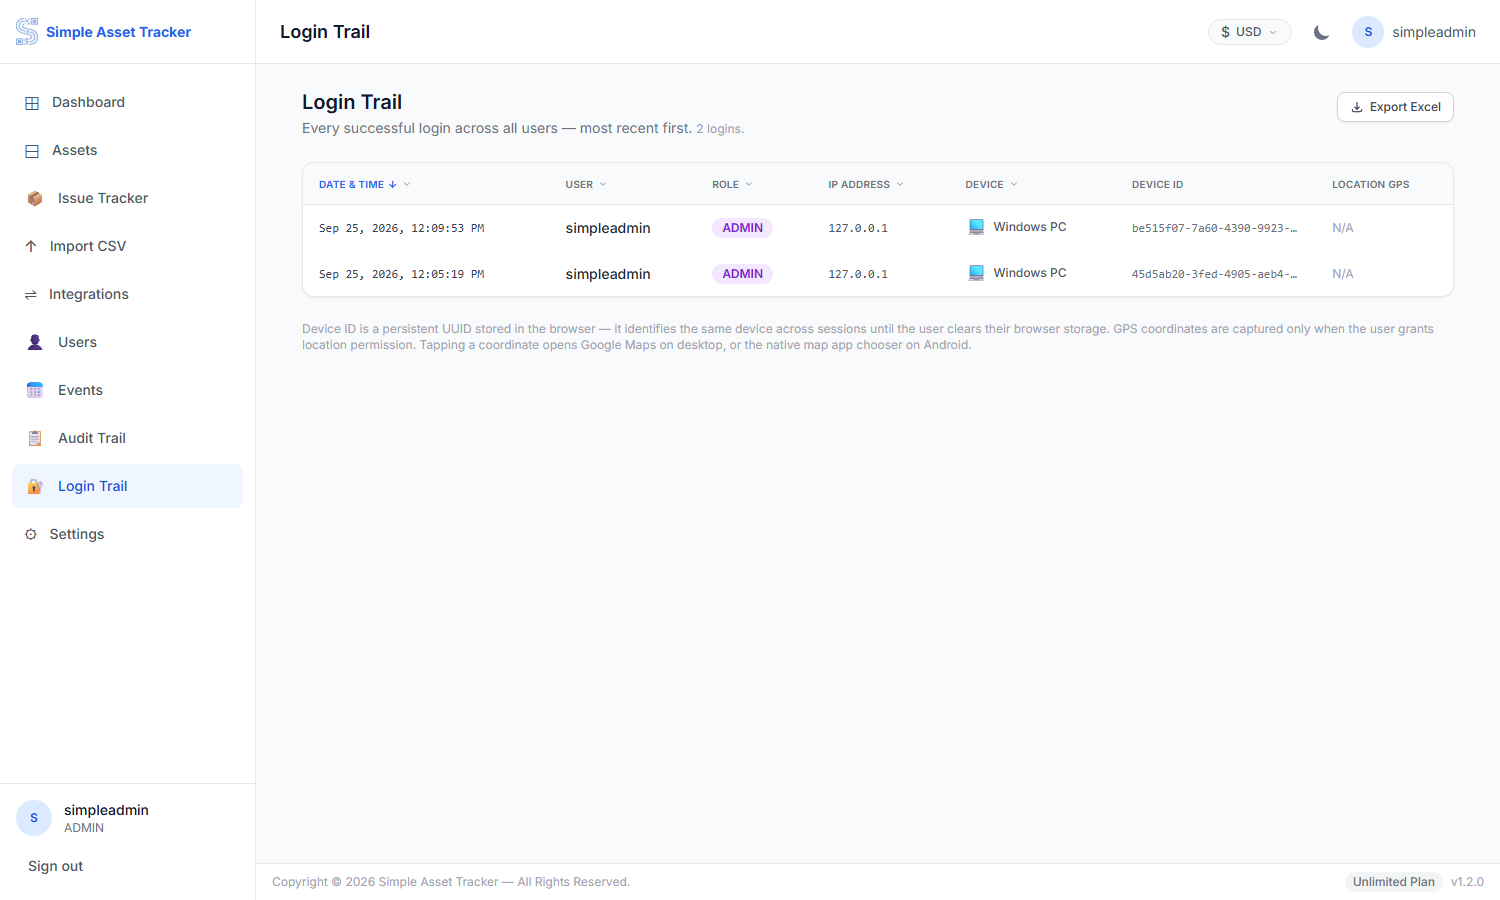
Every successful sign-in is recorded with the time, the account, the IP address and the kind of device. Where the browser has been allowed to share it, the location is recorded too and linked through to a map. The list exports to Excel.
Settings
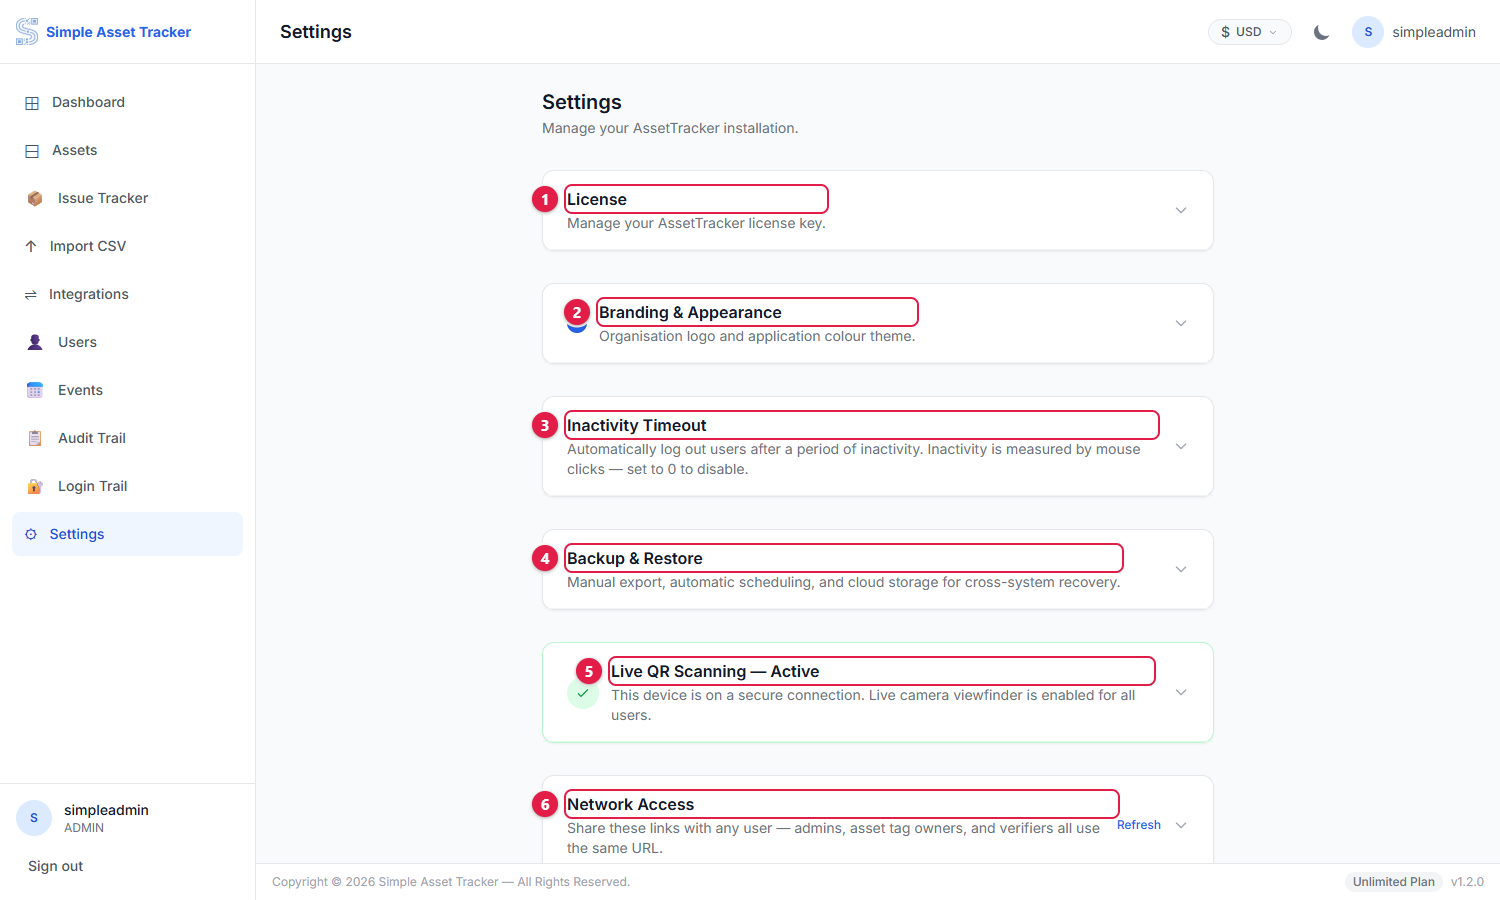
Settings is a stack of cards. Click a card's title to open it.
- 1.License — your licence key and the plan it grants.
- 2.Branding & Appearance — your organisation's logo and the application's colour.
- 3.Inactivity Timeout — how long before idle users are signed out.
- 4.Backup & Restore — manual backups, a schedule, and cloud storage.
- 5.Live QR Scanning — whether the live camera viewfinder is available.
- 6.Network Access — the links to give your field staff.
Two further cards — Network & Ports, and Remote Access — appear for the master administrator only, below the ones listed above.
License
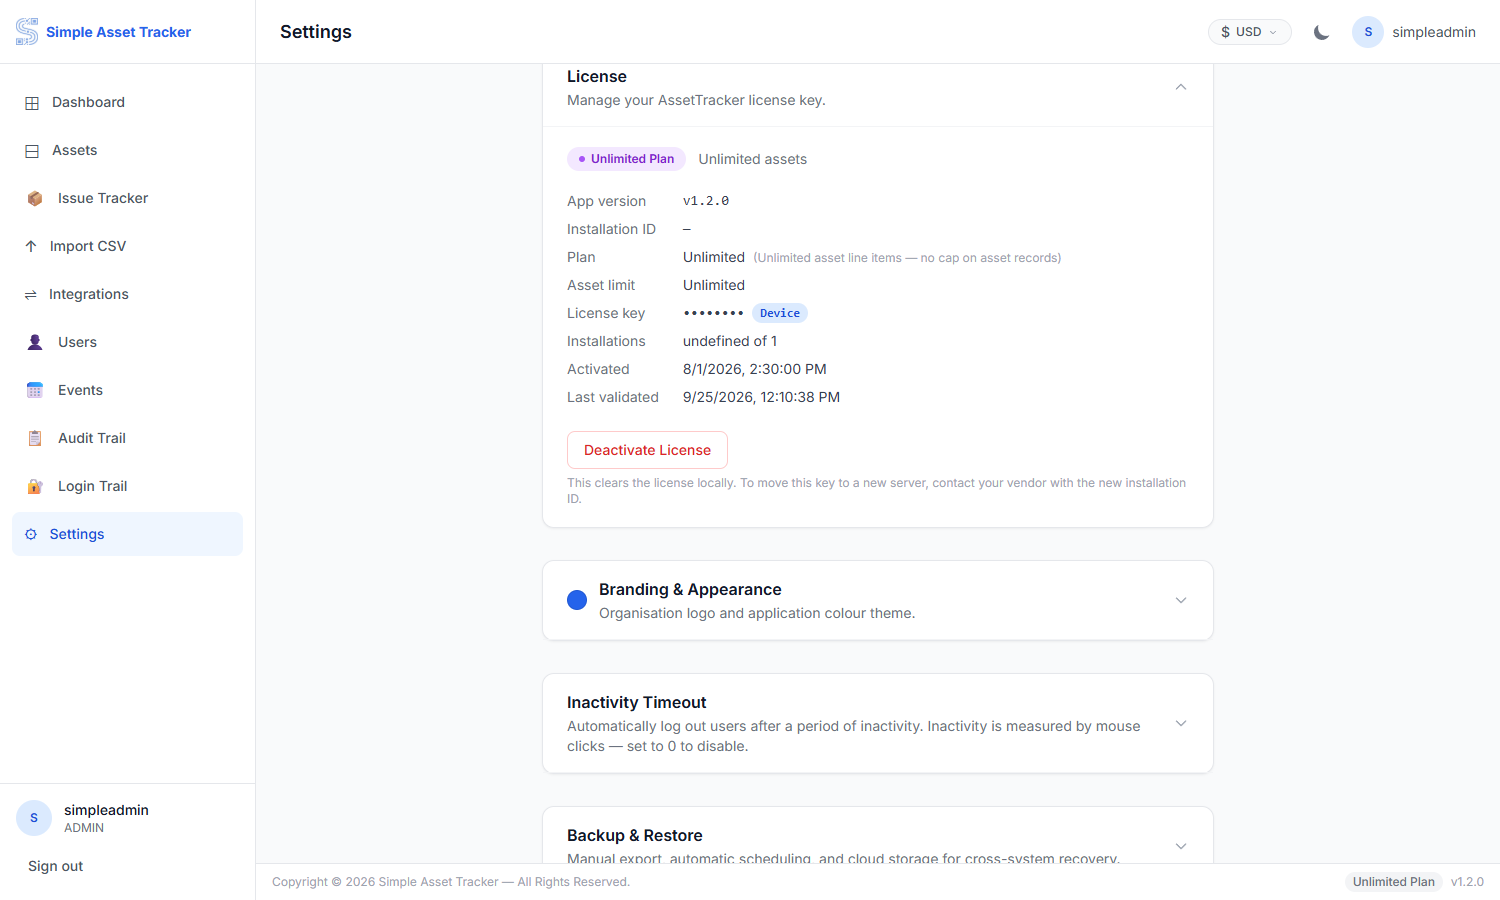
Without a licence the application runs in demo mode, limited to 30 assets. Paste your key here and activate it to lift that limit. The card shows the plan, the asset allowance, how many assets you are using, and when the key was last checked.
Branding & Appearance
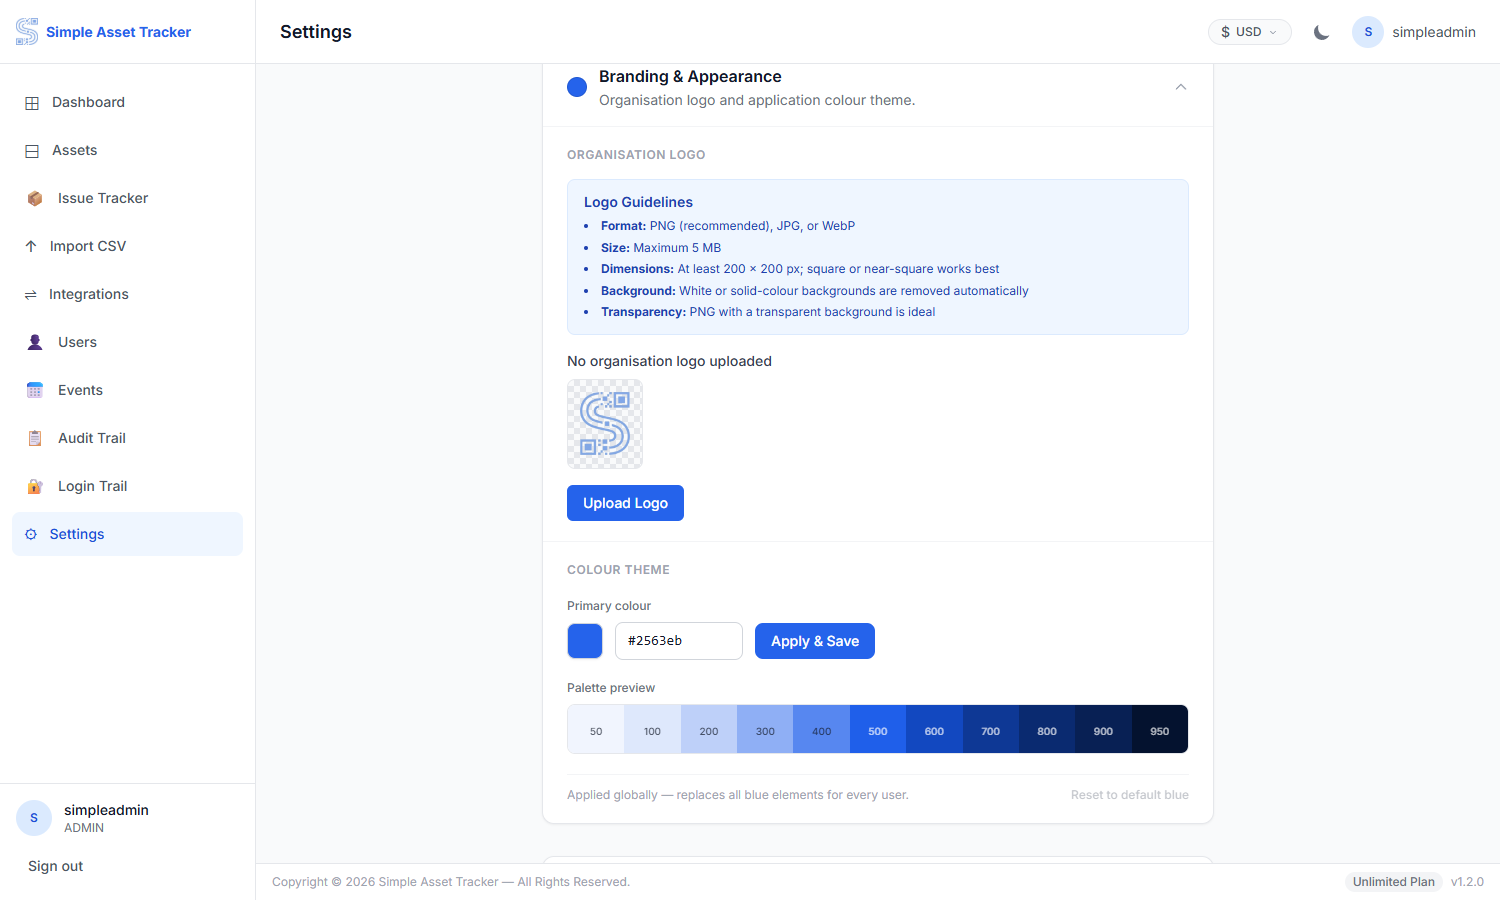
Upload your organisation's logo — PNG, JPG or WebP, up to 5 MB. The background is removed and the image trimmed automatically, so a logo on a white background works well. The logo replaces the product mark in the sidebar and appears on printed output.
Beneath it, the colour theme sets the accent colour used across the application.
Inactivity Timeout
Signs users out automatically after a period without activity. Set it to 0 to disable it. This is worth turning on if the application is used on shared machines.
Backup & Restore
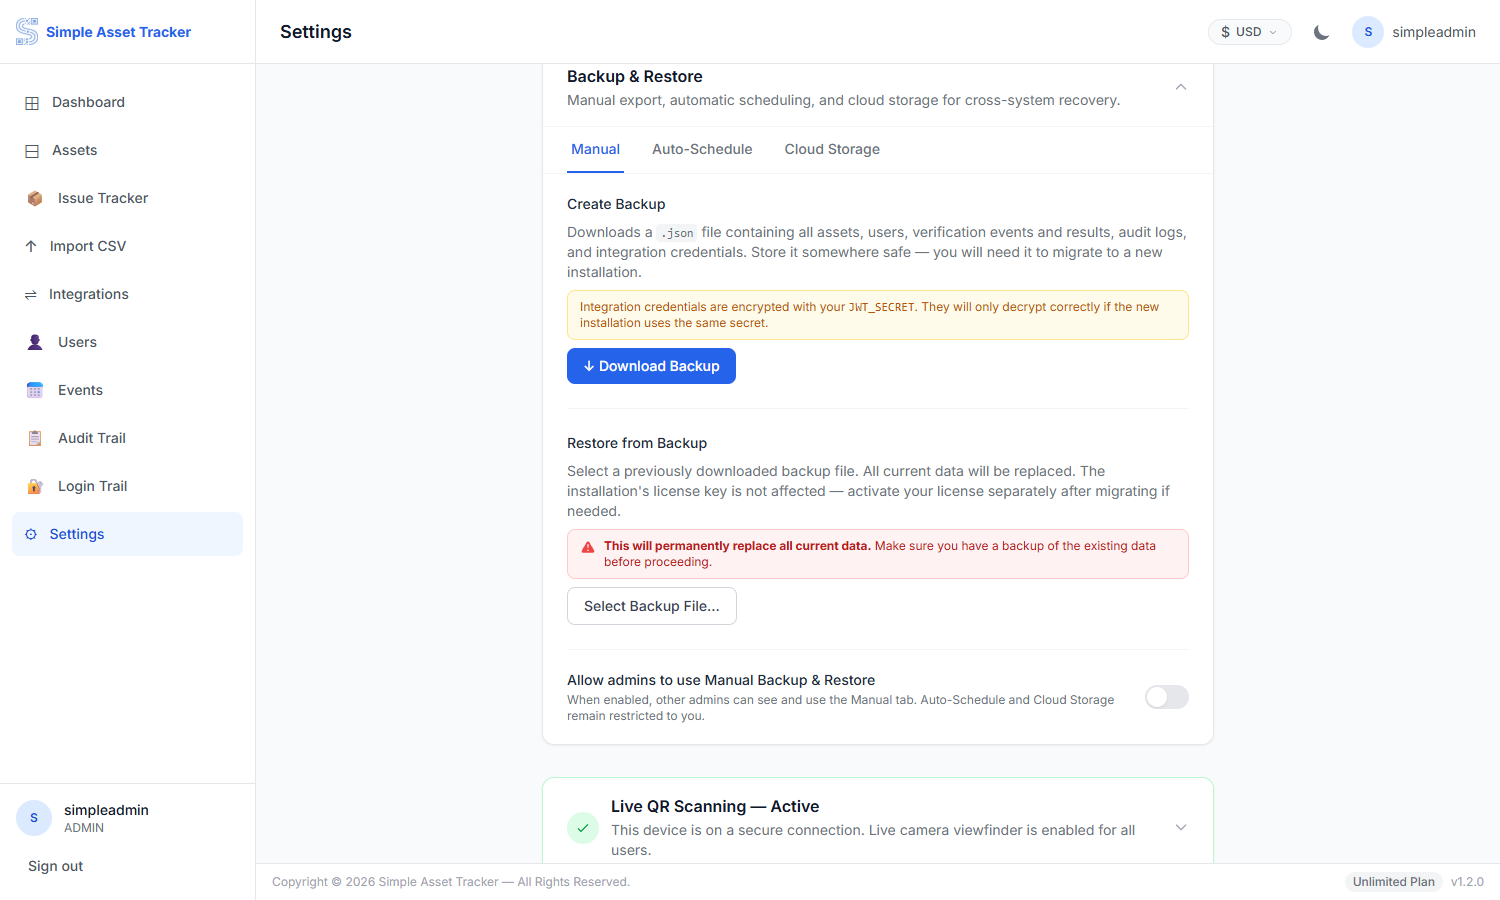
The card has three tabs.
- Manual — Download Backup produces a .json file holding every asset, user, verification, audit record and integration credential. Restoring replaces everything currently in the system with the contents of that file.
- Auto-Schedule — run a backup daily, weekly or monthly at a time you choose, keeping a set number of past copies.
- Cloud Storage — send backups to an S3-compatible bucket. Test the credentials before relying on them.
Live QR Scanning
Scanning a QR label with the camera requires a secure connection. When the application is reached over HTTPS, or over localhost, the live viewfinder is available and this card says so. Over plain HTTP on another machine the browser will not release the camera, and staff fall back to taking a photo instead. The card explains how to install the certificate that fixes this.
Network Access
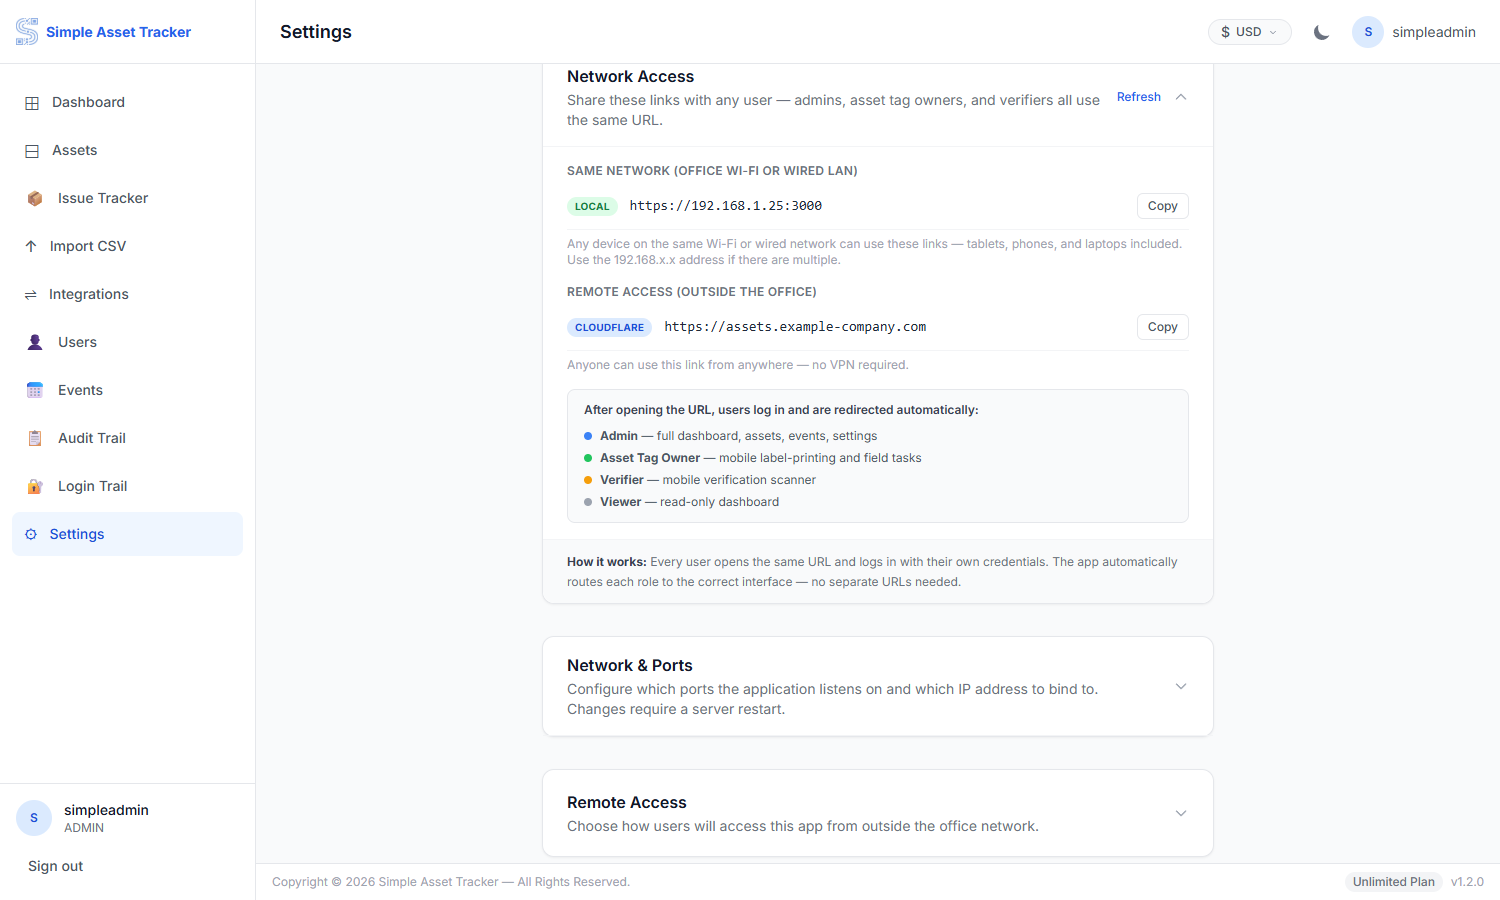
Lists the addresses this installation answers on. Share the appropriate one with your staff; everyone uses the same URL regardless of role, and the application sends each person to the right screen when they sign in.
Network & Ports
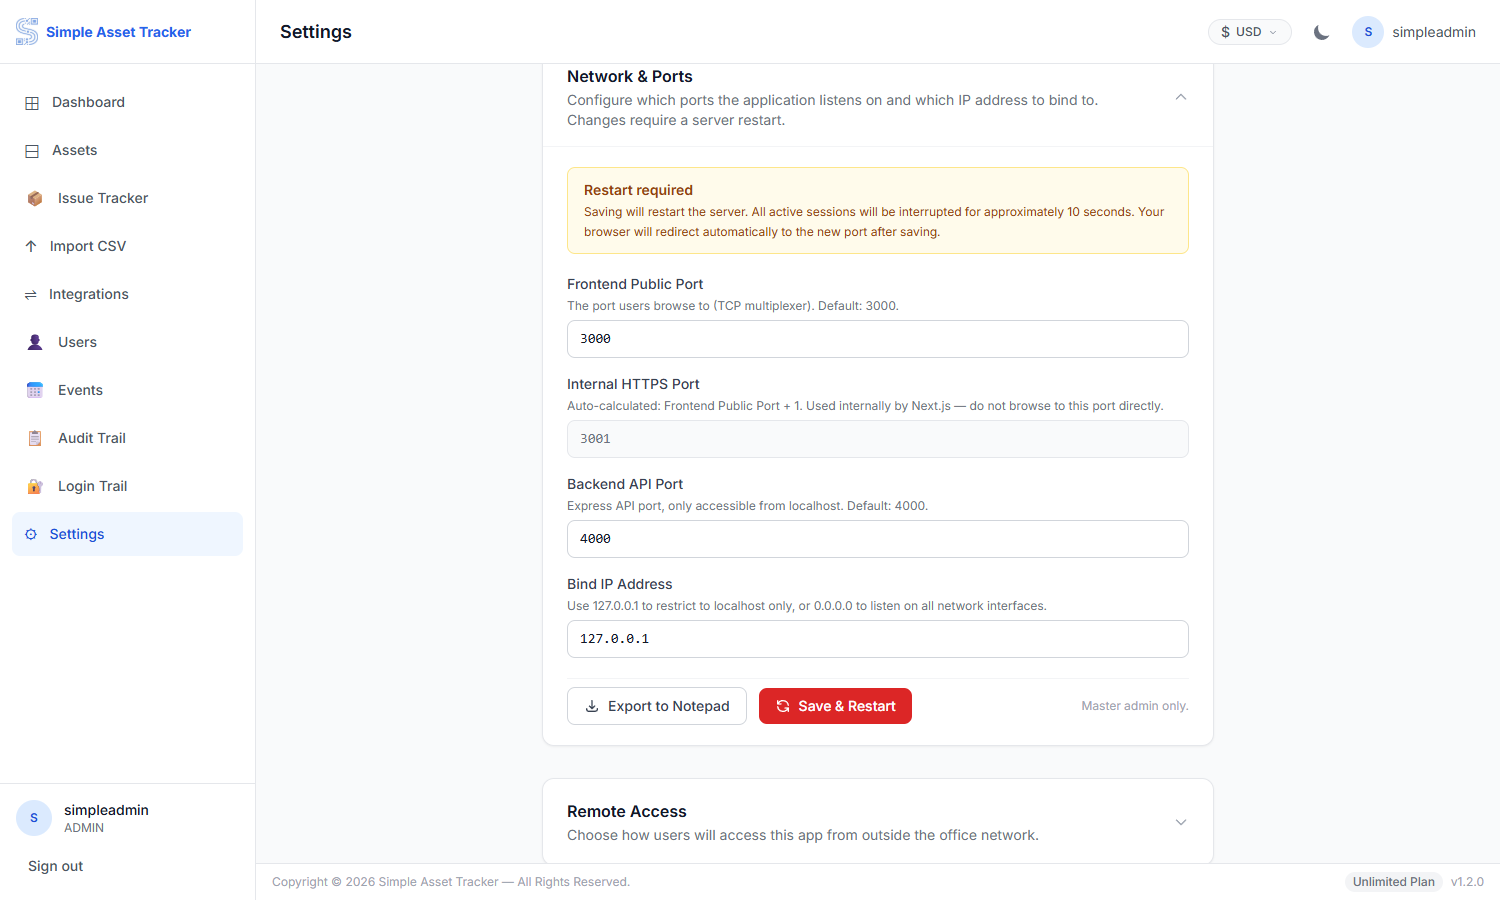
Changes the ports the application listens on and the address it binds to. Ports must be between 1024 and 65535 and must not clash with each other. Saving restarts both parts of the application, so everyone is signed out briefly.
Remote Access
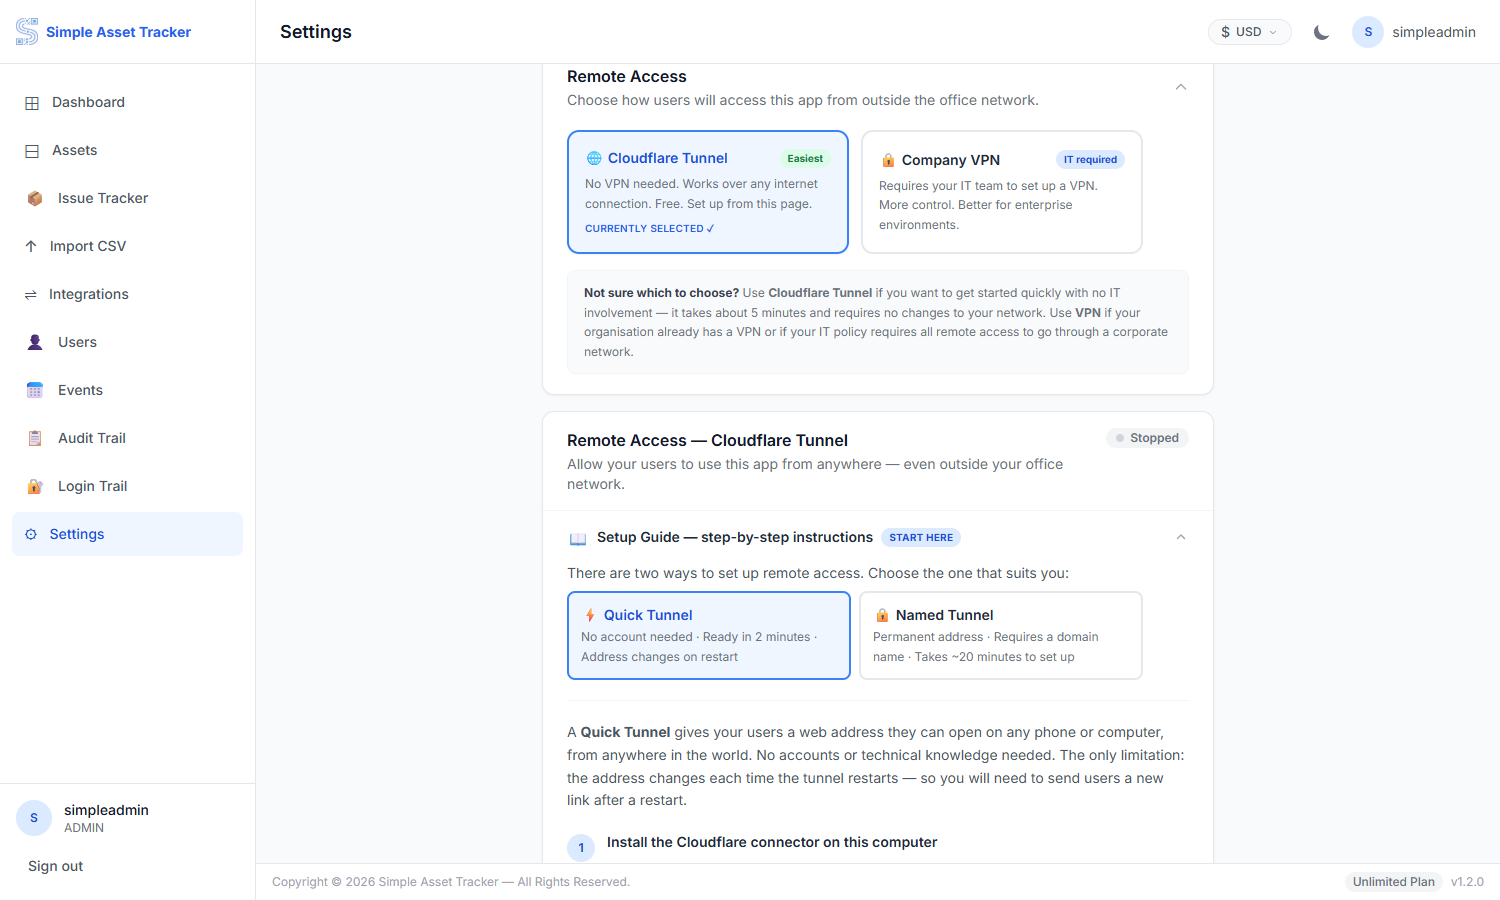
Two ways to reach the application from outside your network: over your company VPN, or through a Cloudflare tunnel that the application can start for you. The card walks you through whichever you pick and shows the tunnel's status once it is running.
Appendix A — What each role can reach
| Section | Admin | Master admin | Verifier | Tag Owner | Issue Tracker | Viewer |
|---|---|---|---|---|---|---|
| Dashboard | Yes | Yes | — | — | — | Yes |
| Assets | Yes | Yes | — | — | Yes | — |
| Issue Tracker | — | Yes | — | — | Yes | — |
| Import CSV | Yes | Yes | — | — | — | — |
| Integrations | — | Yes | — | — | — | — |
| Users | Yes | Yes | — | — | — | — |
| Events | Yes | Yes | — | — | — | Yes |
| Audit Trail | — | Yes | — | — | — | — |
| Login Trail | Yes | Yes | — | — | — | — |
| Settings | Yes | Yes | — | — | — | — |
| Verification | Yes | Yes | Yes | — | — | — |
| My Assets | Yes | Yes | — | Yes | — | — |
Administrators see everything except the master-administrator-only sections: Integrations, Audit Trail, Branding, Network & Ports and Remote Access.
Appendix B — If something goes wrong
| Symptom | What to check |
|---|---|
| A verifier says they have nothing to check | The event must be Open, and assets must be assigned to that person by name. |
| An asset tag owner sees an empty list | Assets appear only when their Assigned To field holds that person's email address. |
| The camera will not start | Scanning needs a secure connection. See Live QR Scanning in Settings. |
| Sign-in is refused after several tries | Sign-in is rate limited after repeated failures. Wait a few minutes and try again. |
| The demo banner will not go away | The licence key has not been activated, or could not be validated. Check the License card in Settings. |
| An import was refused | Check the file is CSV, under 10 MB, and that Asset Name is mapped. |
| Imported dates are blank | The summary lists each date it could not read. Rewrite those as YYYY-MM-DD and import the file again — the assets are updated, not duplicated. |
| An ERP sync duplicated assets that were imported by CSV | The imported ERP IDs did not use the format the sync uses. See Importing an ERP extract. |
| Zoho Test Connection passes but Sync fails | The refresh token lacks the ZohoBooks.fixedasset.READ scope. Generate a new one with both scopes. |
| A tag number will not save | Tag numbers are unique. The message names the asset already using it. |