Want this as a document?
Download the Physical Verifier Guide to print or share.

Simple Asset Tracker
Physical Verifier Guide
For staff who confirm equipment is where the records say it is
Version 1.2.5 · 09 October 2026
About this guide
Your job is to confirm that equipment is where the records say it is. Your administrator sets up a verification event and assigns you a list of assets. You work through the list, recording what you find.
Screenshots are marked with numbered red badges. Each badge matches a numbered step in the text below the picture.
Signing in
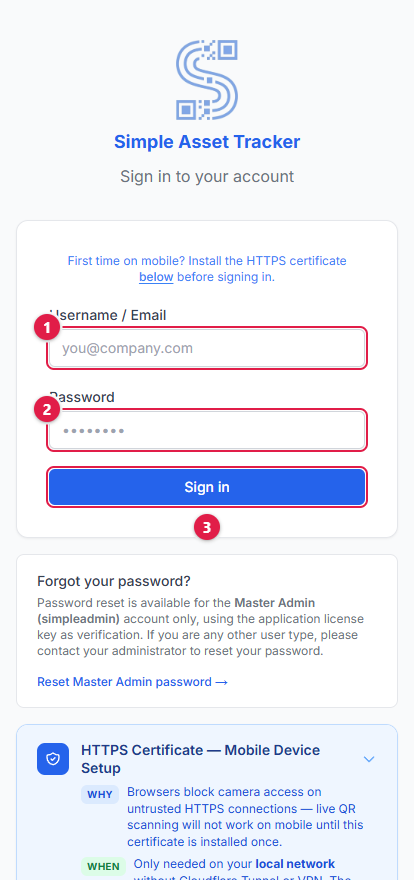
- 1.Type the username your administrator gave you.
- 2.Type your password.
- 3.Click Sign In.
Your administrator will also give you the web address to use. The application knows your role from your account and takes you straight to the right place.
Your list
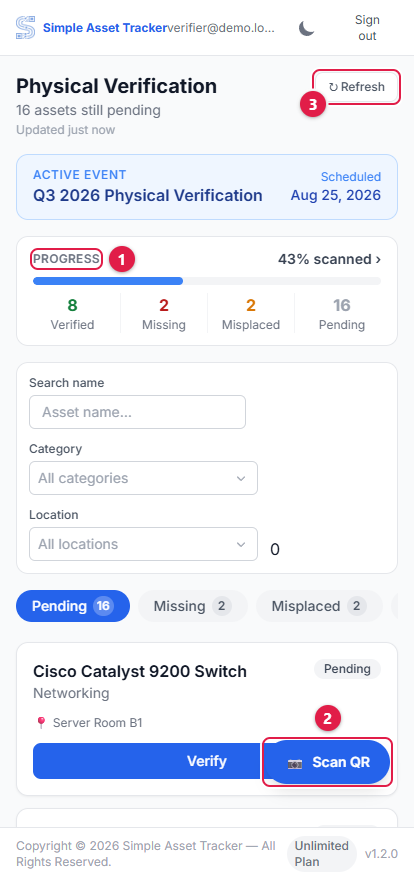
- 1.Progress shows how far through your list you are, and how many you have marked verified, missing or misplaced.
- 2.Scan QR opens the camera so you can scan a label instead of hunting through the list.
- 3.Refresh pulls the latest list from the server and saves it for offline use.
Assets you have not done yet appear first. Use the search box and the category and location filters to work through one area at a time.
Recording what you find
Tap Verify on an asset in your list — or scan its label — and you get the result screen. An asset you have already done shows Re-verify instead; you can always change your answer.
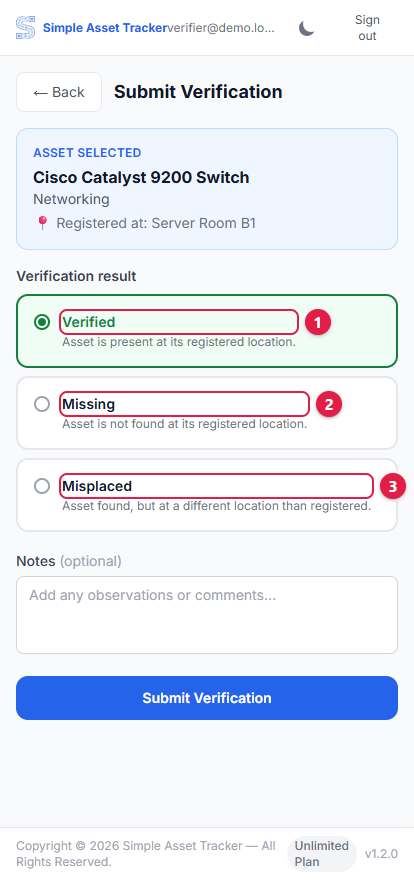
- 1.Verified — the asset is there, where it should be.
- 2.Missing — you could not find it at its registered location.
- 3.Misplaced — you found it, but somewhere else.
Add a note if anything is worth recording, then tap Submit Verification.
If the asset is somewhere else
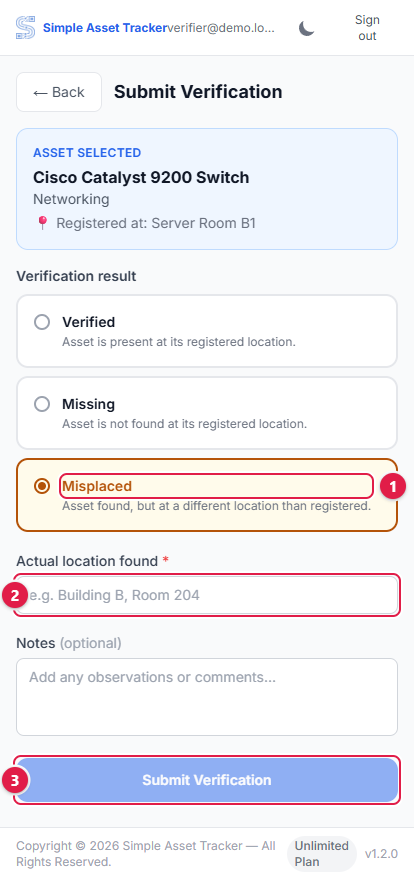
- 1.Choose Misplaced.
- 2.A new box appears — Actual location found. This one is compulsory; the red asterisk marks it. Type where the asset actually is, as precisely as you can.
- 3.Submit Verification stays greyed out until you have filled that box in.
If you find something that is not on your list
Sometimes you come across equipment with no asset tag that is not in your list. Do not leave it out: tap Found something not on the register, just under the event name.
- 1.Say what it is, for example "Dell monitor, 24 inch", and where you found it. Both are compulsory.
- 2.Add the serial number if you can see one, and any notes that would help someone identify it.
- 3.Tap Save. Your administrator sees it on the event and follows it up.
Scanning a label
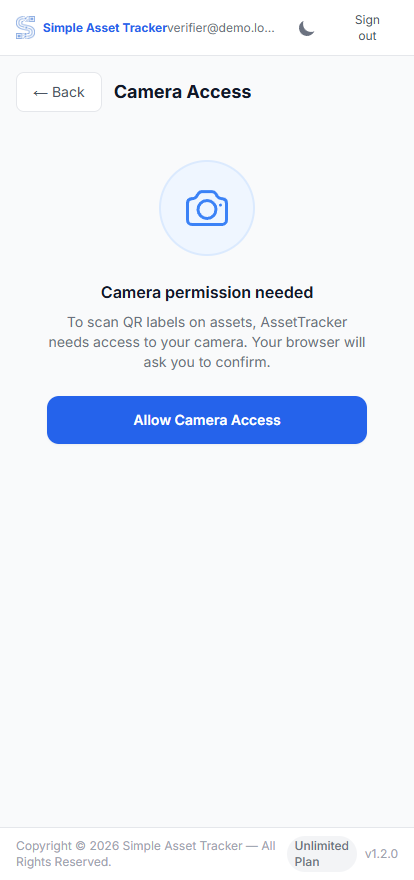
Tap Scan QR. The first time, your phone asks permission to use the camera — say yes. Hold the phone steady so the QR label sits inside the frame. As soon as it reads, you go straight to the result screen with the asset already filled in.
Working without a signal
Stock rooms and basements rarely have good coverage, so the application keeps working without one.
- Tap Refresh while you still have a signal. Your list is saved to the device.
- Off the network, you can carry on recording results, and things you find that are not on the register. They are held on the phone, with the time you recorded them.
- A banner tells you that you are working from saved data, and how old it is.
- When you are back on the network, the saved results are sent automatically.
Your progress
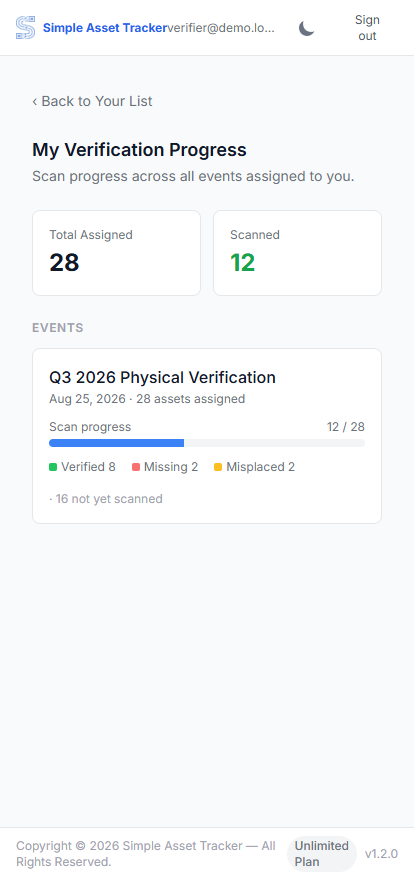
Tap the Progress card at the top of your list to see this. It is a read-only summary — total assets assigned and scanned, and a Verified / Missing / Misplaced breakdown — across every event you have ever been assigned to, not just the one currently active. There is nothing to action here; go back to your list to keep recording results.
Appendix A — Words used in this guide
| Term | What it means |
|---|---|
| Asset | A single piece of equipment the organisation owns. |
| Asset tag | The printed label with a QR code that is stuck onto an asset. |
| Verification event | One round of physical checking, set up by your administrator. |
| Verified | You found the asset where the records said it would be. |
| Missing | You could not find the asset at its recorded location. |
| Misplaced | You found the asset, but somewhere else. You must say where. |
Appendix B — If something goes wrong
| Problem | What to do |
|---|---|
| My list is empty | Nothing has been assigned to you yet. Ask your administrator. |
| The camera will not open | Allow camera access when the phone asks. If it still will not start, the connection may not be secure — tell your administrator. Use the list instead in the meantime. |
| It says I am offline | Carry on working. Your results are saved on the device and sent automatically when you are back on the network. |
| I cannot submit a Misplaced result | Actual location found is compulsory. Submit stays greyed out until it is filled in. |
| I recorded the wrong result | Open the asset again and tap Re-verify. The latest answer is the one that counts. |
| I cannot sign in | Check the username, and remember that repeated failures pause sign-in for a few minutes. Ask your administrator to reset your password if you are stuck. |